Category Archives: ASP.NET Core

The SignalR for ASP.NET Core JavaScript Client, Part 2 – Outside the Browser

Last time we looked at using the ASP.NET Core SignalR TypeScript/JavaScript client in the browser. I mentioned, however, that the new client no longer has dependencies that prevent from using it outside the browser. So, today we will try taking the client outside the browser and use it in a NodeJS application. We will add a NodeJS client for the SignalR Chat service we created last time. Initially we will write the client in JavaScript and then we will convert it to TypeScript.

Let’s start from creating a new folder in the SignalRChat repo and adding a new node project:

mkdir SignalRChatNode
cd SignalRChatNode
npm init

We will call the application signarlchatnode and we will leave all other options set to default values. (6425ec1)

Our application will read messages typed by the user and send them to the server. To handle user input we will use node’s readline module. To see that things, work, let’s just add code to prompts the user for the name and displays it in the console. We will use it a starting point of our application (34bc493).

const readline = require('readline');
let rl = readline.createInterface(process.stdin, process.stdout)

rl.question('Enter your name: ', name => {
console.log(name);
  rl.close();
});

To communicate with the SignalR server we need to add the SignalR JavaScript client to the project using the following command (7875c07):

npm install @aspnet/signalr-client --save

We can now try starting the connection like this (3228a10):

const readline = require('readline');
const signalR = require('@aspnet/signalr-client');

let rl = readline.createInterface(process.stdin, process.stdout);

rl.question('Enter your name: ', name => {
  console.log(name);

  let connection = new signalR.HubConnection('http://localhost:5000/chat');
  connection.start()
  .catch(error => {
    console.error(error);
    rl.close();
  });
});

The code looks good but if you try running it, it will immediately fail with the following error:

Error: Failed to start the connection. ReferenceError: XMLHttpRequest is not defined
ReferenceError: XMLHttpRequest is not defined

What happened? The new JavaScript client no longer depends on the browser but still uses standard libraries like XmlHttpRequest or WebSocket to communicate with the server. If these libraries are not provided the client will fail. Fortunately, the required functionality can be easily polyfilled in the NodeJS environment. For now, we will just stick the polyfills on the global object. It’s not beautiful by any means but will do the trick. We are discussing how to make it better in the future but at the moment this is the way to go.

Depending on the features of SignalR you plan to use you will need to provide appropriate polyfills. Currently the absolute minimum is XmlHttpRequest. SignalR client uses it to send the initial OPTIONS HTTP request which initializes the connection on the server side and for the long polling transport. So, if use the long polling transport only, XmlHttpRequest is the only polyfill you will need to provide . If you want to use the WebSockets transport you will need a WebSocket polyfill in addition to XmlHttpRequest. (We are thinking about skipping sending the OPTIONS request for WebSockets. If this is implemented you will not need the XmlHttpRequest polyfill when using the WebSockets transport.) For ServerSentEvents transport you will need an EventSource polyfill. Finally, if you happen to use binary protocols (e.g. MessagePack) over the ServerSentEvent transport you will need polyfills for atob/btoa functions. For simplicity, we will use the WebSocket transport in our application so we will add only polyfills for XmlHttpRequest and WebSockets:

npm install websocket xmlhttprequest --save

and make them available globally via:

XMLHttpRequest = require('xmlhttprequest').XMLHttpRequest;
WebSocket = require('websocket').w3cwebsocket;

If we run the code now we will see something like this:

moozzyk:~/source/SignalRChat/SignalRChatNode$ node index.js
Enter your name: moozzyk
moozzyk
Information: WebSocket connected to ws://localhost:5000/chat?id=0d015ce4-3a78-4313-9343-cb6183a5e8ea
Information: Using HubProtocol 'json'.

which tells us that the client was able to connect successfully to the server. (946f85d)

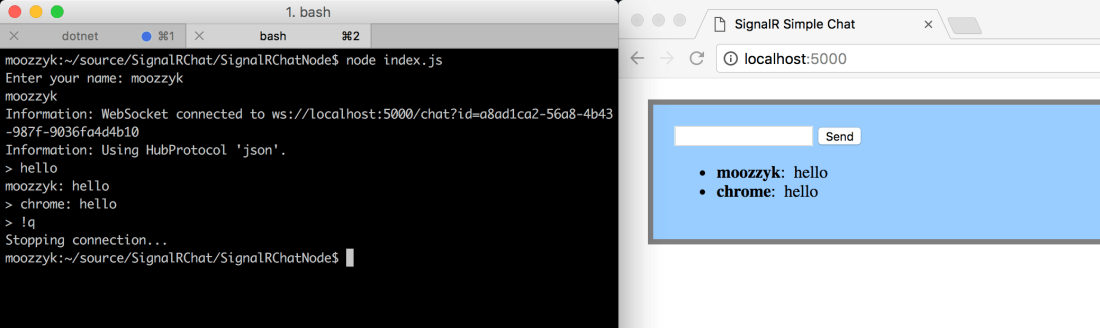
Now, we need to add some code to handle user input and interact with the server and our Node SignalR Chat client is ready. (I admit that the user interface is not very robust but should be enough for the purpose of this post). You can now talk to browser clients from your node client and vice versa (0f7f71f):

Screen Shot 2017-09-30 at 6.57.14 PM

Now let’s convert our client to TypeScript. We will start from creating a new TypeScript project with tsc --init. In the generated tsconfig.json file we will change the target to es6. We will also add an empty index.ts file and delete the existing index.js file (we will no longer need the index.js file since we will now be generating one by compiling the newly created index.ts). (b83cf92) If you now run tsc you should see an empty index.js file created as a result of compiling the index.ts file.  The last thing to do is to actually convert our JavaScript code to TypeScript. We could just translate it one-to-one but we can do a little better. TypeScript supports async/await which makes writing asynchronous code much easier. Since many of SignalR client methods return Promises we can just await these calls instead of using .then/.catch functions. Here is how our node SignalRChat client written in TypeScript looks like (2a6d0e9):

import * as readline from "readline"
import * as signalR from "@aspnet/signalr-client"

(<any>global).XMLHttpRequest = require("xmlhttprequest").XMLHttpRequest;
(<any>global).WebSocket = require("websocket").w3cwebsocket;

let rl = readline.createInterface(process.stdin, process.stdout);

rl.question("Enter your name: ", async name => {
  console.log(name);
  let connection = new signalR.HubConnection("http://localhost:5000/chat");

  connection.on("broadcastMessage", (name, message) => {
    console.log(`${name}: ${message}`);
    rl.prompt(true);
  });

  try {
    await connection.start();
    rl.prompt();

    rl.on("line", async input => {
      if (input === "!q") {
        console.log("Stopping connection...");
        connection.stop();
        rl.close();
        return;
      }
      await connection.send("send", name, input);
    });
  }
  catch (error) {
    console.error(error);
    rl.close();
  }
});

You can run it by executing the following commands:
tsc
node index.js

Today we learned how to use the ASP.NET Core SignalR client in the NodeJS environment. We created a small node JavaScript application that was able to communicate with browser clients which. Finally, we converted the JavaScript code to TypeScript and learn a little bit about the TypeScript’s async/await feature.

Advertisement

The SignalR for ASP.NET Core JavaScript Client, Part 1 – Web Applications

The first official release of SignalR for ASP.NET Core – alpha1 – was just released. In this release, all SignalR components were rewritten to make SignalR simpler, easier to use and more reliable.

The SignalR JavaScript client has always been a fundamental part of SignalR. Unfortunately, it has a few limitations which made it hard to extend or use outside the browser. The rewrite allowed to introduce changes which allow to take the client outside the browser (no more dependency on jQuery, YAY!) and open new scenarios. And this is what this blog post will focus on. I split the post to two parts. In the first part I will show how to use the client in a web application from both JavaScript and TypeScript. In the second, part we will look at NodeJS.

The plan for this part is to recreate the chat application from the tutorial on the previous version of SignalR and then to convert it to use the new SignalR Server and JavaScript client. The sample is simple enough to allow us to focus on SignalR aspects rather than on application intricacies. As a bonus, we will see what the experience of porting an application from the previous version of SignalR is. I created a github repo for the application where each commit is a step described in this post. I will refer to particular commits from this post to show changes for a given step.

Setting up the Server

Let’s start from creating an empty ASP.NET Core application. We can do that from command line by running the dotnet new web command. (See this step on github).

Once the application is created we can start the server with dotnet run and make sure it works by navigating to http://localhost:5000 from a browser.

After we ensured that the application runs we can add SignalR server components. First, we need to add a reference to the SignalR package to the SignalRChat.csproj file (See this step on github).

Now we can add the Chat Hub class – we will just copy the code from tutorial and tweak a few things. This is how the hub class looks after the changes:

using System;
using Microsoft.AspNetCore.SignalR;
namespace SignalRChat
{
    public class ChatHub : Hub
    {
        public void Send(string name, string message)
        {
            // Call the broadcastMessage method to update clients.
            Clients.All.InvokeAsync("broadcastMessage", name, message);
        }
    }
}

The changes we made were only cosmetic – we removed the reference to the System.Web namespace, added 'Core' to the Microsoft.AspNet.SignalR so that it reads Microsoft.AspNetCore.SignalR. We also changed how we invoke the client-side method by passing the method name as the first parameter to the InvokeAsync call. (See this step on github).

Now that we created a hub we need to configure the application to be aware of SignalR and to forward SignalR related messages to our hub. It’s as easy as calling AddSignalR extension method in the ConfigureServices method of our Startup class and mapping the hub with the UseSignalR method. We will also add the static files middleware which will be responsible for serving static files. The Startup class should look like this:

public class Startup
{
    public void ConfigureServices(IServiceCollection services)
    {
        services.AddSignalR();
    } 

    public void Configure(IApplicationBuilder app, IHostingEnvironment env)
    {
        if (env.IsDevelopment())
        {
            app.UseDeveloperExceptionPage();
        }

        app.UseFileServer();

        app.UseSignalR(routes =>
        {
            routes.MapHub<ChatHub>("chat");
        });
    }
}

(See this step on github).

And this is all the work we had to do create a functional SignalR chat server. Now we can focus on the client side.

The JavaScript Client

In the new version of SignalR the JavaScript client is distributed using npm. The npm module contains a version of the client that can be just included in a web page using the tag, as well as, typings and modules that can be consumed from TypeScript. To get the client to your machine you need to install npm if you haven’t already and run:

npm install @aspnet/signalr-client

The client will be installed in the node_modules folder and you can find the necessary files to include in the node_modules/@aspnet/signalr-client/dist/browser folder. You may wonder why there are so many files in this folder and what purpose they serve. Let’s go over them then and explain.

First, you will find that there are two sets of files – files that contain ES5 in the names and files that do not contain ES5 in the names. SignalR JavaScript uses ES6 (a.k.a EcmaScript 2015) features like Promises or arrow functions. Not all browsers however, support ES6 (looking at you Internet Explorer). The files without ES5 in the names are meant to be used in browsers that support ES6. The files that contain ES5 in the names are the ES6 files transpiled to ES5. They are ES5 compatible and include all required dependencies. The downside of the ES5 files is that they are much bigger than ES6 files.

Another interesting set of files are files containing msgpackprotocol in the name. The new version of SignalR supports custom hub protocols – including binary protocols – and has built-in support for a binary protocol based on MessagePack. The JavaScript implementation of the MessagePack based hub protocol (using the msgpack5) turned out to be quite big so we moved it to a separate file. This way you can include the MessagePack hub protocol only if you want to use it and will not pay the price if you don’t care.

You will also find that each file has a min counterpart. These are just minified versions of the corresponding files. You will want to use the minified versions in production but debugging is much easier with non-minified files so you may want to use non-minified versions during development.

Finally, there is also the third-party-notices.txt file. These are notices for the msgpack5 library and its dependencies used in the MessagePack hub protocol implementation.

Using the SignalR JavaScript Client from JavaScript

Now, that we know a little bit about the JavaScript client let’s update our application to use it.

First, let’s copy all the files from the node_modules/@aspnet/signalr-client/dist/browser folder to a new ​scritps/signalr folder under the wwwroot. (See this step on github).

After the files are copied, let’s create the index.html file in the wwwroot folder and paste the contents of the html file from the tutorial. (See this step on github).

If you try to run the application at this point it will not work. The index.html has references to files like the jQuery library or the old SignalR client which don’t exist. Let’s fix that. Note that even though jQuery is no longer required to the new SignalR client I will continue to use it to minimize the number of changes I need to make. All in all this is not a tutorial on how to remove jQuery from your app so let’s not get sidetracked. Let’s start from sorting out the scripts situation. For jQuery, I will replace the link with the one to the jQuery CDN. For SignalR, I will replace the link to the signalR-2.2.1.min.js file with signalR-client-1.0.0-alpha1.js (feel free to use the ES5 version if you are using a browser that don’t support ES6 features) and remove the link to hubs since hub proxies are currently not supported. (See this step on github (github trick – notice that the link ends with ?w=1 – try removing it and see what happens. Very useful when reviewing some PRs)).

Now we can finally fix the code. Fortunately, this is not a lot of changes:

  • Instead of using proxies we will just create a new HubConnection
  • To register the callback for the client side broadcastMessage method we will use the on function
  • We will replace the done method used by jQuery deferreds to the then used by ES6 promises
  • We will invoke hub methods with the invoke function

(See this step on github).

That’s pretty much it. If you run the application now you should be able to send and receive messages.

Using the JavaScript Client from TypeScript

We now know how to use the new JavaScript SignalR client from JavaScript code. The SignalR client module contains also all necessary bits that make it possible to be consumed from TypeScript. To see how it works let’s take our chat application a bit further and convert it TypeScript.

First, make sure that you have a recent TypeScript compiler installed – run tsc --version from command line. If running the command fails or you have an older version installed install the latest one using this command:

npm install typescript -g

After installing or updating the typescript compiler we will initialize a new project by running

tsc --init

in the project folder. This will create a tsconfig.json file which will look like this:

{
  "compilerOptions": {
    "target": "es6",
    "module": "commonjs",
    "strict": true,
    "noImplicitAny": true
  }
}

after performing some cleanup. We will also add a new chat.ts file which we will leave empty for now. If you run the tsc command from project root you should see an almost empty chat.js file generated from your chat.ts file. (See this step on github).

Because we are using TypeScript and will bring dependencies using npm we will no longer need JavaScript files for the browser so let’s delete them. (See this step on github).

To be able to add and restore dependencies the client will need, let’s create a package.json file by executint the npm init command. We will leave default values for almost all settings except for the project name which needs to be lowercase.

PS C:\source\SignalRChat\SignalRChat> npm init
This utility will walk you through creating a package.json file.
It only covers the most common items, and tries to guess sensible defaults.
See `npm help json` for definitive documentation on these fields
and exactly what they do.

Use `npm install <pkg> --save` afterwards to install a package and
save it as a dependency in the package.json file.

Press ^C at any time to quit.
name: (SignalRChat) signalrchat
version: (1.0.0)
description:
entry point: (chat.js)
test command:
git repository:
keywords:
author:
license: (ISC)
About to write to C:\source\SignalRChat\SignalRChat\package.json:

{
"name": "signalrchat",
"version": "1.0.0",
"description": "",
"main": "chat.js",
"dependencies": {},
"devDependencies": {},
"scripts": {
"test": "echo \"Error: no test specified\" && exit 1"
},
"author": "",
"license": "ISC"
}

Is this ok? (yes)
PS C:\source\SignalRChat\SignalRChat>

Now let’s add our dependencies – signalr-client, jquery and jquery typings (they enable using jquery from TypeScript). We will use the --save-dev option to save the dependencies as dev dependencies in the package.json file.

npm install @aspnet/signalr-client --save-dev
npm install jquery --save-dev
npm install @types/jquery --save-dev

We also need to install browserify – a tool which we will use to create the final script to be used by the browser:

npm install -g browserify

(See this step on github).

We can now start working on the code. First, we need to import the dependencies we are going to use. We can do that by adding the following two lines at the top of our chat.ts file:

import * as signalR from "@aspnet/signalr-client"
import * as $ from "jquery

Now we can move the script from our .html file to the .ts file. If you do that and play a little bit with the code you will notice that intellisense now tells you about class members and function parameters and if you press F12 (in Visual Studio Code) it will take you to the function header. Another thing, you will see is an error on line 5.  This TypeScript telling you that there is a type mismatch for the parameter passed to the jQuery val() function – the prompt() function can return null which is not a valid input for the val() function.

VSCodeSignalR

In our case we know that prompt will return string so we will just cast the result to string to suppress the error.

Since we moved the function to the .ts file we can now remove all the JavaScript code from our index.html file. We can also remove all the tags since we no longer depend on them to bring dependencies (we also already deleted the scripts). (See this step on github).

Let’s compile our chat.ts file now by running tsc command. If you look at the generated chat.js file you will notice that it looks pretty much the same as the source chat.ts file with some additional lines at the top. You will also notice that it does not have the required dependencies (i.e. signalr-client and jquery). This is where browserify comes into play. We will use browserify to generate the final version of the file with all the dependencies. Let’s run the following command (you may need to create the wwwroot/scripts folder if one does not exist) from the project folder:

browserify .\chat.js -o .\wwwroot\scripts\chat.js

Take a look at the chat.js file that was created by browserify and now you will see that the file is much bigger and contains all the required dependencies. If we include this file in our index.html with the tag, start the application and open in the browser you will see that it works and you can send and receive messages. (See this step on github). We could even automate build steps (e.g. with gulp) but it’s out of scope for this post.

Summary

In this post, we looked at using the new SignalR JavaScript client in web applications. We learned how to use the client from both JavaScript and TypeScript. We tried to port an application using the previous version of SignalR to see how hard it is. In the next part, we will take a look at using the client in NodeJS applications.

SignalR Core Part 2/3: ASP.Net Core Sockets

Disclaimer: SignalR Core is still in early stages and changing rapidly. All information in this post is subject to change.

To test some of the scenarios described in the first part of this mini-series I came up with an idea for a relatively simple application where users can report to the server the weather at their location and their report will be broadcast to all the connected clients. I called this application SocialWeather. The central part of the system is an ASP.Net Core application running SignalR Core server. The server can handle massages received in one of the following formats – JSON, Protobuf and pipe (the pipe format is a simple format I created where the data is separated by the pipe (|) and the message ends with the new line character (\n)). I also created 3 different clients – a JavaScript clients using the JSON format, a C# client using Protobuf and a lua client using the pipe format. The JavaScript client is part of a web page served by the same application that hosts the server. The C# client is a console application that that can send and receive Protobuf messages. The lua client is the most interesting as it runs on an ESP8266 development board with the NodeMCU firmware. The whole system is using the “socket” level of the new SignalR which is a kind of counterpart of persistent connection in the previous version of SignalR (so no hubs API here). All the clients use bare websockets to connect to the server (in other words there is no SignalR client involved).

The SocialWeather server, which includes the JavaScript client is a sample project in the SignalR repo and you can run it yourself – just clone the repo, run build.cmd/build.sh to install the correct version of the runtime and restore packages. Then go to the samples/SocialWeather folder and start the server with dotnet run.

The C# and lua clients are in my personal repo. Running the C# client is straightforward. After you clone the repo you need to restore packages update the URL to the SignalR server and run the client with dotnet run. Each time you press Enter the client will generate a random weather report and send it to the server. If you type “!q:” the client will exit.

The lua client is meant to run on an ESP8266 compatible board with NodeMCU firmware installed. Preparing the board to run the client requires a bit of work. The first step is to set up serial communication to the board. If the module you have is equipped with a USB port (I have the Lolin v3 board which does have a USB port) it should be enough to install a VCP (Virtual COM Port) drivers (you can find the drivers here http://www.ftdichip.com/FTDrivers.htm or here http://www.silabs.com/products/mcu/pages/usbtouartbridgevcpdrivers.aspx). If your board doesn’t have a USB port, you will need to use an additional module (e.g.  Arduino)  for USB-to-serial translation (you can find tutorials about setting it up on the web).

The next step is to make sure that your board has the right firmware. It needs to be a NodeMCU firmware with net, http, wifi, and websocket support. You can request a build here and follow steps in this tutorial to re-image your board. When the board is ready you should be able to connect to it using a serial terminal (I used screen on Mac and Putty on Windows). On Windows determine the COM port number the board is using using the Device Manager. On Mac it will be one of the /dev/tty* devices. The speed needs to be set to 115200. When using Putty make sure the Flow Control setting is set to None or the communication will not be working correctly.

puttyflowcontrol

Once on the device you need to connect it to your wireless network by sending the following commands (you need to replace SSID with the name of the network and PWD with the password or an empty string for open networks):

wifi.setmode(wifi.STATION)
wifi.sta.config(SSID, PWD)
wifi.sta.connect()

We are now ready to run the client. If you haven’t already, clone the repo containing the client go to src/lua-client folder and update the URL to the SocialWeather SignalR server. Now you can transfer the file to the device (if you are connected to the device with the terminal you need to disconnect). The nodemcu-uploader Python script does the job.

If all stars aligned correctly you should be able now to start the client by executing:

dofile(“social-weather.lua”)

it will print a confirmation message once it connected  successfully to the server and then will print weather reports sent by other client. You can also send your own weather report just by typing:

ws:send(“72|2|0|98052\n”)

and pressing Enter.

The command may look a bit cryptic but is quite simple. The ws is a handle to the websocket instance created by the social-weather.lua script. send is a method of the websocket class so we literally invoke the send method of websocket interactively. The argument is a SocialWeather report in the pipe format: a pipe separated list of values – temperature, weather, time, zipe code – terminated with \n.

This is what it looks like when you run all three clients:

social-weather

Let’s take a look at how things work under the hood. On the server side the central part is the SocialEndPoint class which handles the clients and processes their requests. If you look at the loop that processes requests it does not do any parsing on its own. Instead it offloads parsing to a formatter and deals with strongly typed instances. Formatter is a class that knows how to turn a message into an object of a given type and vice versa. In case of the SocialWeather application the only kind of messages sent to and from the server are weather reports so this is the only type formatters need to understand.

When sending messages to clients the process is reversed. The server gives the formatter a strongly typed object and leaves it to formatter to turn it into a valid wire format.

How does the server know which formatter to use for a given connection? All available formatters need to be registered in the DI container as well as mapped to a type they can handle and format. When establishing the connection, the client sends the format type it understands as a query string parameter. The server stores this value in the connection metadata and uses later to resolve the correct formatter for the connection.

On the client side things are even simpler. The lua client has just 30 lines of code half of which is concerned with printing weather reports in a human readable form. Because the format of the connection cannot change once the connection is established message parsing can be hardcoded. The rest is just setting up the websocket to connect to the server and react to incoming message notifications.

The C# client is equally simple. It contains two asynchronous loops – one for receiving messages (weather reports) from the server and one for sending messages to the server. Again, handling the wire format (which in this case is Protobuf) is hardcoded in the client.

This is pretty much all I have on ASP.Net Core Sockets. With a simple application we were able to validate that the new version of SignalR can handle many scenarios the old one couldn’t. We were able to connect to the server from different platforms/environments without using a dedicated SignalR client. The server was capable of handling clients that use different and custom message formats – including a binary format (Protobuf). Finally, all this could be achieved with a small amount of relatively simple code.

SignalR Core Part 1/3: Design Considerations

Disclaimer: SignalR Core is still in early stages and changing rapidly. All information in this post is subject to change.

A few months ago, we started working on the new version of SignalR that will be part of the ASP.Net Core framework. Originally we just wanted to port existing code and iterate on it. However, we soon realized that doing so would prevent us from enabling new scenarios we wanted to support. The original version of SignalR was designed around long polling (note that back in the day support for websockets was not as common as it is today – it was not supported by many web browsers, it was not supported in .NET Framework 4, it was not (and still isn’t) supported natively on Windows 7 and Windows 2008 R2). A JSON based protocol was baked in and could not be replaced which blocked a possibility of using other (e.g. binary) formats. Starting the connection was heavy and complicated – it required sending 3 HTTP requests whose responses had to be correlated with messages sent over the newly created transport (you can find a detailed description of the protocol in SignalR on the wire – an informal description of the SignalR protocol – a post I wrote on this very subject). This basically meant that a dedicated client was required to talk to a SignalR server. In the old design the server was centered around MessageBus – all messages and actions had to go through the message bus. This made the code very complex and error prone especially in scale-out scenarios where all the servers were required to have the same data. The state (e.g. cursors/message ids, groups tokens etc.) was kept on the client which would then send it back to the server when needed (e.g. when reconnecting). The need of keeping the state up-to-date significantly increased the size of the messages exchanged between the server and the client in most of the non-trivial scenarios.

In the new version of SignalR we wanted to remove some of the limitations of the old version. First, we decided to no longer use long polling as the model transport. Rather, we started with a premise that a full duplex channel is available. While this might sound a lot of like websockets we are thinking that it will be possible to take it further in the future and support other protocols like TCP/IP. Note, it does not mean that the long polling and server sent events transports are going away. Only, that we would not drag better transports down to the standards of worse transports (e.g. websockets supported binary format but long polling (until XmlHttpRequest2) and server sent events didn’t so in the old version of SignalR there was no support for binary messages. In the new version we’d rather base64 encode messages if needed and let users use what websockets offers). Second, we did not want to bake in any specific protocol or message format. Sure, for hub invocations we will still need to be able to get the name of the hub method and the arguments but we will no longer care how this is represented on the wire. This opens the way to using custom (including binary) formats. Third, establishing the connection should be lightweight and connection negotiation can be skipped for persistent duplex transports (like websockets). If a transport is not persistent or uses separate channels for sending and receiving data connection negotiation is required – it creates a connection id which will be used to identify all the requests sent by a given client. However, if there are no multiple requests because the transport is full duplex and persistent (like in the case of websockets) the connection id is not needed – once the connection is established in the first request it is used to transfer the data in both directions. In practice, this means that you can connect to a SignalR server without a SignalR client – just by using bare websockets.

There are also a few things that we decided not to support in the new SignalR. One of the biggest ones was the ability re-establish a connection automatically if the client loses a connection to the server. While it may not be obvious, the reconnect feature has a huge impact on the design, complexity and performance of SignalR. Looking at what happens during reconnect should make it clear. When a client loses a connection, it tries to re-establish it by sending the reconnect request to the server. The reconnect request contains the id of the last message the client received and the groups token containing the information about groups the client belongs to. This means that the server needs to send the message id with each message so the client can tell the server what was the last message it received. The more topics the client is subscribed to the bigger the message id gets up to the point where the message id is much bigger than the actual message.

Now, when the server receives a reconnect request it reads the message id and tries to resend all the messages the client missed. To be able to do that the server needs to keep track of all messages sent to each client and buffer at least some recent messages so that it can resend them when needed. Indeed, the server has a buffer per connection which it uses to store recent messages. The default size of that buffer is 1000 messages which creates a lot of memory pressure. The size of the buffer can be configured to make it smaller but this will increase the probability of losing messages when a reconnect happens.

The groups token has similar issues – the more groups the client belongs to the bigger the token gets. It needs to be sent to the client each time the client joins or leaves a group so the client can send it back in case of reconnects to re-establish group membership. The size of the token limits the number of groups a client can belong to – if the groups token gets too big the reconnect attempt will fail due to the URL being bigger than the limit.

While auto-reconnect will no longer be supported in SignalR users can build their own solution to this problem. Even today people try restarting their connection if it was closed by adding a handler to the Closed event in which they start a new connection. It can be done in a similar fashion in SignalR core. It’s true that the client will no longer receive messages it missed but this could happen even in the old SignalR – if the number of message the client missed was greater than the size of the message buffer the newest messages would overwrite the oldest messages (message buffer is a ring buffer) so the client would never receive the oldest messages.

Another scenario we decided not to support in the new version of SignalR was allowing clients to jump servers (a multi-server scenarios). Before, the client could connect to any server and then reconnect or send a data to any other server in the farm. This required that all servers had all the data to be able to handle requests from any client. The way it was implemented was that when a server receive a message it would publish it to all the other SignalR servers via MessageBus. This resulted in a huge number of messages being sent between SignalR servers.

(Side note. Interestingly, the scenario of reconnecting to a different server than the one the client was originally connected to often did not work correctly due to server misconfiguration. The connection token and groups token are encrypted by the server before sending them to the client. When the server receives the connection token and/or groups token it needs to be able decrypt it. If it cannot, it rejects the request with the 400 (Bad Request) error. The server uses the machine key to encrypt/decrypt the data so, all machines in the farm must have the same machine key or the connection token (which is included in each request) encrypted on one server can’t be decrypted on another server and the request fails. What I have seen several times was that servers in the farm had different machine keys so, reconnecting to a different server did not actually work.)

In the new SignalR the idea is that the client sticks only to one server. In multi-server scenarios there is a client to server map stored externally which tells which client is connected to which server. When a server needs to send a message to a client it no longer needs to send the message to all other servers because the client might be connected to one of them. Rather, it checks what server the client is connected to and sends the message only to this client thus the traffic among SignalR server is greatly reduced.

The last change I want to talk about, somewhat related to the previous topic, is removing the built-in scale-out support. In the previous version of SignalR there was one official way of scaling out SignalR servers – a scale out provider would subclass the ScaleoutMessageBus and leave all the heavy lifting to SignalR. It sounds good in theory but with the time it became apparent that with regards to scale-out there is no “one size fits all” solution. Scaling out an applications turned out to be very specific to the application goals and design. As a result, many users had to implement their own solution to scaling out their applications yet still paid the cost of the built-in scale-out (even when using just one server there is an in-memory message bus all messages go through). While, scale-out support is no longer built-in the project contains a Redis based scale-out solution that can be used as-is or as a guidance to create a custom scale-out solution.

These are I think the biggest design/architecture decision we have made. I believe that they will allow to make SignalR simpler, more reliable and performant.

Running ASP.NET Core Applications with IIS and Antares (Azure Websites)

I have seen a few articles (including official docs on http://docs.asp.net) about publishing and running  ASP.NET Core applications in IIS (or Azure/Antares). Unfortunately, I was not satisfied by either of them. Yes, they showed steps you need to follow to make things work. Yes, they touched on some aspects of how things work. No, they did not explain what’s really happening, why it’s happening and how the blocks fit together. Hence this post – something I would like to read if I wanted to run my ASP.NET Core application using IIS or Azure.

Before we can get into details we need to understand how things work at a high level. The most important thing is that ASP.NET Core applications are no longer tightly coupled to IIS as it was with previous versions. Rather, IIS is acting now merely as a reverse proxy and the application itself runs as a separate process using the Kestrel HTTP server. Decoupling ASP.NET from IIS was necessary to enable running ASP.NET Core applications on other platforms. It also makes development easier because it allows to avoid the overhead of IIS/IIS Express during development by making it possible to run your application directly using Kestrel. Note that in production environment it is recommended to always run Kestrel behind a reverse proxy like IIS or  NGINX.

Going back to IIS HTTP requests are handled as follows:

  1. IIS receives a request
  2. IIS (ASP.NET Core Module) starts the ASP.NET Core application in a separate process (if the application is not already running) – i.e. the application no longer runs as w3wp.exe but as dotnet.exe or myapp.exe
  3. IIS forwards the  request to the application
  4. Application processes the request and send the response to IIS
  5. IIS forwards the response to the client

Out of these 5 steps, step two is the most interesting, the most complicated and the most fragile. There is a few pieces that need to be aligned to successfully start an ASP.NET Core application from IIS: ASP.NET Core Module, web.config file and application configuration. Let’s take a look at them one by one and discuss their role.

ASP.NET Core Module (sometimes abbreviated to ANCM) is a native IIS module that starts the application and implements reverse proxy functionality. It is installed as part of ASP.NET Core tooling for Visual Studio or can be installed separately – (the Windows (Server Hosting) package from https://www.microsoft.com/net/download.

web.config – tells IIS to use ASP.NET Core Module to process requests. It also tells ASP.NET Core Module what process (application) to start. Note, that you don’t use web.config to configure your application – it is only used by IIS. Here is how a typical web.confing of an ASP.NET Core application looks like:

<?xml version="1.0" encoding="utf-8"?>
<configuration>
  <system.webServer>
    <handlers>
      <add name="aspNetCore" path="*" verb="*" modules="AspNetCoreModule" resourceType="Unspecified"/>
    </handlers>
    <aspNetCore processPath="dotnet" arguments=".\HelloWorld.dll" stdoutLogEnabled="false" stdoutLogFile=".\logs\stdout" />
  </system.webServer>
</configuration>

Application configuration – a typical Main method of an ASP.NET Core application looks like this:

var host = new WebHostBuilder()
            .UseKestrel()
            .UseContentRoot(Directory.GetCurrentDirectory())
            .UseIISIntegration()
            .UseStartup<Startup>()
            .Build();

from the perspective of running the application using IIS the lines that are important are UseKestrel and UseIISIntegration.  UseKestrel configures Kestrel as the application web server. This is important from IIS perspective since you can’t use WebListener and IIS together at the moment (https://github.com/aspnet/IISIntegration/issues/8). UseIISIntegration does a bit of magic to fulfill ASP.NET Core Module expectations and registers the IISMiddleware.

With the information above we can now drill into how IIS starts ASP.NET Core applications. When IIS  receives a request for an ASP.NET Core application it passes the request to the ASP.NET Core Module. IIS was configured to do this by the following entry in the the web.config file:

<handlers>
  <add name="aspNetCore" path="*" verb="*" modules="AspNetCoreModule" resourceType="Unspecified"/>
</handlers>

Upon receiving the request the ASP.NET Core Module will attempt to start the application if it is not already running. The name of the process to start and its arguments are specified in web.config  as the processPath and arguments attributes on the aspNetCore element. ASP.NET Core Module also sets a few environment variables for the application process – ASPNETCORE_PORT , ASPNETCORE_APPL_PATH and ASPNETCORE_TOKEN. Here is where the UseIISIntegration magic happens. When the application starts, the code inside UseIISIntegration method tries to read these environment variables and if they are not empty they will be used to configure the url/port the application will listen on. (If the above environment variables are not set UseIISIntegration won’t try to configure anything so that you can use your own settings when running the application directly (i.e. without IIS)). One important detail to pay attention to is where you put the call to UseIISIntegration when configuring your application with WebHostBuilder. You need to make sure that you don’t try to set server urls after you called UseIISIntegration otherwise the url set by UseIISIntegration will get overwritten and your application will be listening on a different port that Asp.NET Core Module expects. As a result things will not work.

ASPNETCORE_TOKEN is a pairing token. IIS middleware added to the pipeline by UseIISIntegration will check each request if it contains this value and will reject requests that don’t. This is to prevent from accepting requests that did not come from IIS.

These are the fundamental blocks needed to run your ASP.NET Core application with IIS and on Azure (Antares). You can now go and set things up as described in some tutorials and actually understand what you are doing and why.

There is, however, a  second level of confusion which happens when you start using Visual Studio and you see additional magic. The first thing that is confusing is web.config. You create a new ASP.NET Core application, open web.config and you see this line instead of what I showed above:

<aspNetCore processPath="%LAUNCHER_PATH%" arguments="%LAUNCHER_ARGS%" stdoutLogEnabled="false" stdoutLogFile=".\logs\stdout" forwardWindowsAuthToken="false"/>

You start wondering what are these %LAUNCHER_*% environment variables, who is supposed to set them and how IIS (or whoever) knows what values to put there. Honestly, I don’t exactly know how these environment variables work but I treat them as placeholders that Visual Studio replaces when you start your application with F5/Ctrl+F5. When you publish your application to run in a production environment you can’t have these placeholders in web.config – no one knows about them and no one is going to replace them or set values (I also don’t think you can just set environment variables with these names and they will be picked up automatically – this is why I call these strings placeholders – they look as if they were environment variables but I don’t think they behave as environment variables). So how does this work then? If you look at your project.json file you will see a "scripts" section looking more or less like this:

"scripts":
{
"postpublish":
"dotnet publish-iis --publish-folder %publish:OutputPath% --framework %publish:FullTargetFramework%"
}

It just tells dotnet to run the publish-iis tool after the application is published. What is publish-iis (or a better question would be “what publish-iis isn’t”)? publish-iis isn’t… doing much. There are a lot of misconceptions about the publish-iis tool but it actually is a very simple tool. It goes to the folder where the application was published (not your project folder) and checks if it contains a web.config file. If it doesn’t it will create one. If it does it will check what kind of application you have (i.e. whether it is targeting full CLR or Core CLR and – for Core CLR – whether it is a portable or standalone application) and will set the values of the processPath and arguments attributes removing %LAUNCHER_PATH% and %LAUNCHER_ARGS% placeholders on the way. Note that publish-iis is not a Visual Studio tool. It’s independent and whether you are using Visual Studio or you publish your application from command line using dotnet publish it will work as long as it is configured as a postpublish script in your project.json. That’s pretty much what publish-iis is.

Troubleshooting

Since there are a few pieces that need to be aligned to run ASP.NET Core application with IIS things tend to go wrong. If you don’t know how these pieces are supposed to work together (i.e. you did not read the first part of this post) you can search the internet, try random hints from stackoverflow and pray and most likely you still won’t be able to make your application work. But now you know know how things are supposed to work so you can be much more effective in troubleshooting problems. I will only focus on the infamous 502.3 Bad Gateway error as this is the most common one. I read about other failures (https://docs.asp.net/en/latest/publishing/iis.html) but so far have not seen any of them. So, if your application does not work with IIS what to do?

  • Make sure ASP.NET Core Module is installed. It will be installed on your dev box because it is installed with Visual Studio Web Tooling but it may not be on the server you are deploying your application to
  • Try running your published application without IIS – in the command prompt go to the folder where the application was published to and run dotnet {myapp}.dll (a portable Core CLR app) or {myapp}.exe (a standalone application or an application targeting full CLR)
  • If above works – make sure dotnet.exe is on the global %PATH%. It might be on the %PATH% for you but IIS is running using a different account which may not have path to dotnet.exe set. Add the path to the folder dotnet.exe lives in (typically C:\Program Files\dotnet) to the global %PATH% environment variable. I had to do iisreset.exe to make the change effective in IIS
  • Check web.config file of the published application – verify it has actual values and not %LAUNCHER_PATH%/%LAUNCHER_ARGS% placeholders. Make sure the processPath  corresponds to the application type (i.e. you can’t start a portable application with {myapp}.exe because there is only {myapp}.dll in the folder)
  • Check event log – ASP.NET Core Module writes to event log and you can find some useful (and some bogus) entries in the event log
  • Turn on logging – you probably noticed stdoutLogFile and stdoutLogEnabled attributes on the aspNetCore element. They are very helpful to diagnose issues – especially issues related to application start up. If you set stdoutLogEnabled to true ASP.NET Core Module will write all the output written by the application to the console to the stdoutLogFile file. Note that the folder configured in the stdoutLogFile attribute must exist, otherwise (at least at the moment) the file won’t be created. In case of Azure/Antares the path should look like:  \\?\%home%\LogFiles\stdout  (the \\?\%home%\LogFiles folder always exists). In fact if you publish your application to Azure/Antares using Visual Studio tooling it will make publish-iis set stdoutLogPath to point to the folder above and you can turn on logging by merely setting stdoutLogEnabled to true.
    Note that std out logging should not be used as a poor man’s file logging. It’s very useful to diagnose startup issues since they often happen before loggers are created and/or configured but if you want to log to a file configure your application to use a real logging and logging framework. (There is also a plan to create a simple file logger https://github.com/aspnet/Logging/issues/441)

app_offline

The last thing to mention is app_offline.htm. app_offline.htm is a feature of ASP.NET Core Module where ASP.NET Core Module will monitor your application directory and if it notices the app_offline.htm file (note – at the moment the file must not be empty: https://github.com/aspnet/IISIntegration/issues/174) it will stop your application and will respond to requests with the contents of the app_offline.htm file. This makes application deployment much easier since you no longer need to deal with the problem of locked files that are loaded into the process of a running application. Once you remove the app_offline.htm file from the folder ASP.NET Core Module will start your application on the first request. app_offline.htm is used by the deployment tool (WebDeploy) that ships with Visual Studio (note that in preview1 this tool uses app_offline.htm only when deploying to Azure/Antares but it is supposed to be fixed so that app_offline.htm is used by default when deploying to file system (think: IIS)).

So, these are the basics of running ASP.NET Core application with IIS. The topic is much broader but the details described in this post will hopefully make working with IIS  in the ASP.NET Core world less painful and help those who need to transition from previous versions of ASP.NET.