I caused a SEV. Here is what I learned.

About a year ago, I caused the biggest incident (a.k.a. SEV) since the formation of our team. After rolling out my changes, one of the services dropped all the data it received.

Here is what happened and what I learned from it.

Context

Our system is a pipeline of a few streaming services, i.e., the output of one service is the input to the next service in the pipeline. These services process data belonging to different categories. Due to tight timelines, our initial implementation didn’t allow for distinguishing them. While this implementation worked, monitoring, validation, and data analysis were challenging for a few teams. To make the lives of all these teams easier, I decided to implement support for categorization properly.

As my changes weren’t supposed to modify the output of the pipeline, I considered them to be refactoring. Even though I knew this refactoring would be massive and span a few services, I treated it like a side project. I didn’t set any timelines or expectations and worked on it in my free time. As a result, the project dragged on for months because I could only work on it intermittently. The timeline below depicts it:

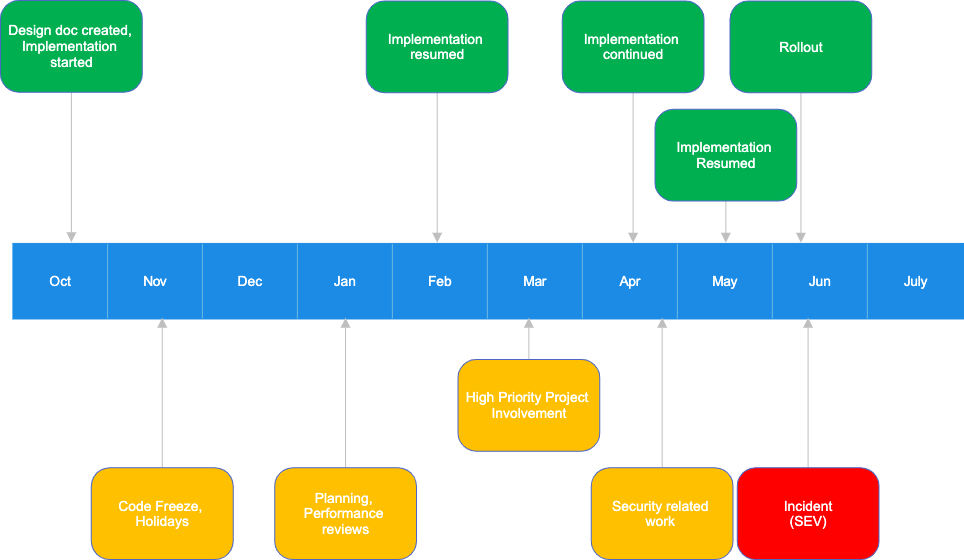
After months of on-and-off work, I finished the implementation in late May and rolled out my changes in early June. A few hours later, alerts indicating missing data went off. My rollout was the primary suspect of the outage, and we quickly confirmed it was indeed the culprit.

Root cause

Our investigation found that the last service in the pipeline had a misconfigured feature flag, which caused the outage. The purpose of this feature flag was to prevent duplicate data from being emitted during validation. It was necessary because, during validation, I sent uncategorized and categorized data sets through the pipeline and compared them. However, the pipeline should only ever output one dataset, so one had to be removed. The easiest way to achieve the correct output during validation was to drop the categorized dataset. The feature flag controlled this behavior.

During the rollout, upstream services started producing only the new, categorized dataset. However, because the feature flag still used the validation setting, the downstream service dropped all data it received.

That’s the technical explanation. But the more interesting question is: why did I forget to configure the feature flag correctly?

I added the feature flag as one of the first implementation steps—almost half a year before the rollout. Because of all the distractions, I forgot that I even touched this service. During the rollout, I again focused only on validating upstream services because, in my mind, these were the only services I modified.

Lessons learned

Every incident is an opportunity to learn something. This one is no different. Here are the two most important lessons I learned from it.

Lesson 1: Avoid taking on tasks I know I can’t properly focus on. Working on and off was very ineffective. Each time I resumed working on my project, I had to spend considerable time remembering where I left off, only to pause again soon after. Instead, I should have worked with my manager to find an engineer who could work on this project without distractions, deliver it faster, and learn from it.

Lesson 2: A reminder always to validate changes end-to-end. In my case, I only focused on services I thought I modified. Had I checked the pipeline output, I would have caught the issue almost immediately.

The end-to-end validation principle applies to any software development work. One example could be unit tests: passing unit tests don’t guarantee that an application works as expected. Quickly loading the application and verifying changes can help catch issues that unit tests didn’t flag. This is important because users care whether the application works, not if unit tests pass.

The paradox of test coverage

When I learn that code owned by a team has low test coverage, I expect “here be dragons.” But I never know what to expect if the code coverage is high. I call this a paradox of high test coverage.

High test coverage does not tell much about the quality of unit tests. Low coverage does.

The low coverage argument is self-explanatory. If tests cover only a small portion of the product code, they cannot prevent bugs in the code that is not covered. The opposite is, however, not true: high test coverage does not guarantee a quality product. How is this possible?

Test issues

While unit tests ensure the quality of the product code, nothing, except the developer, ensures the quality of the unit tests. As a result, tests sometimes have issues that allow bugs to sneak in. Finding unit test issues is more luck than science. It usually happens by accident—usually when tests continue to pass despite code changes that should trigger test failures.

One of the simplest examples of a unit test issue is missing asserts. Tests without asserts are unlikely to flag issues. Other common problems include incorrect setup and bugs caused by copying existing tests and incorrectly adapting them to test a new scenario.

Mocking issues

Mocking allows the code under test to be isolated from its dependencies and simulate the dependency behavior. However, when the simulation is incorrect or the behavior of the dependency changes, tests may happily pass, hiding serious issues.

I’ve been working with C++ code bases, and I often see developers assume, without confirming, that a dependency they use won’t throw an exception. So, when they mock this dependency, they forget about the exception case. Even though their tests cover all the code, an exception in production takes the entire service down.

Uncovered code

Getting to 100% code coverage is usually impractical, if not impossible. As a result, a small amount of code is still not covered. Similar to the low coverage scenarios, any change to the code that is not covered can introduce a bug that won’t be detected.

Chasing the coverage number

Test coverage is only a metric. I’ve seen teams do whatever it takes to achieve the metric goal, especially if it was mandated externally, e.g., at the organization or company level. Occasionally, I encountered teams that wrote “test” code whose primary purpose was increasing coverage. Detecting or preventing bugs was a non-goal.

Low test coverage is only the tip of the iceberg

At first sight, low test coverage seems a benign issue. But it often signals bigger problems the team is facing, like:

  • spending a significant amount of time fixing regressions
  • shipping high-quality new features is slow due to excessive manual validation
  • many bugs reach production and are only caught and reported by users
  • the on-call, if the team has one, is challenging
  • the engineering culture of the team is poor, or the team is under pressure to ship new features at an unsustainable pace
  • the code is not very well organized and might be hard to work with, only slowing down the development even further
  • test coverage is likely lower than admitted to and will continue to deteriorate

I’ve worked on a few teams where developers understood the value of unit testing. They treated test code like product code and never sent a PR without unit tests. Because of this, even if they experienced the problems listed above, it was at a much smaller scale. They also never needed to worry about meeting the test coverage goals – they achieved them as a side effect.

Top 5 Unit Test Problems That Haunt Software Developers

Well-written unit tests are one of the most effective tools for ensuring product quality. Unfortunately, not all unit tests are well written, and the ones that are not are often a source of frustration and lost productivity. Here are the most common unit test issues I encountered during my career.

Flaky unit tests

Flaky tests pass most of the time, but not always. They may randomly fail even though no code has changed. The quickest and most common “fix” developers employ is to re-run them. With time, the number of flaky tests grows, and even multiple re-runs are insufficient.

Flaky tests are caused primarily by the following:

  • shared state
  • dependency on external systems

A shared state is the number one cause of test flakiness. Static variables could be one example. If one test sets a static variable and another passes only if this variable is set, the second test will fail if the order of execution changes.

Debugging flakiness caused by shared state is usually tricky because sharing state is rarely intentional.

Tests that depend on external systems tend to be flaky because the systems they rely on are outside their control. Any deployments, crashes, or throttling will cause test failures. Network, which is inherently unreliable, is yet another contributor. The best fix is to mock external dependencies.

Multithreaded applications deserve special mention. Race conditions in the product code could make tests for these applications flaky, and finding the root cause is often challenging.

Slow tests

Slow tests are a productivity killer. If running tests for a code change takes more than a few seconds, developers will use it as an excuse to find a distraction.

One of the most common reasons tests are slow is their dependency on external systems: network calls and the time to process the requests initiated by tests add up.

But tests that depend on external systems are also flaky, so slowness and flakiness go hand-in-hand.

Again, mocking external dependencies is the best fix to make tests fast and reliable.

If relying on external systems is intentional (e.g., end-to-end testing), it is worth separating end-to-end tests into a dedicated suite executed separately, for instance, as part of the nightly build.

I was once on a team where running all the tests took more than two hours because most of them communicated with a database. These tests were also flaky, so merging more than one Pull Request a day was virtually impossible.

Bugs in unit tests

Tests are there to ensure the quality of the product, but nothing is there to ensure the quality of tests. As a result, tests may fail to do their job due to bugs. Unfortunately, identifying these bugs is not easy. Paying attention can help. For instance, if all tests continue to pass after changing the product code, it usually indicates either bugs in tests or missing test coverage.

Hard to maintain tests

Tying tests and implementation details closely usually causes numerous test failures after even simple product code changes. Keeping tests focused on functionality instead of on the implementation can significantly reduce the number of unnecessary test failures.

Writing “tests” only to hit the code coverage number

Test code written solely to meet code coverage goals is usually low quality. Assertions in such code are often missing because they don’t contribute to the coverage goal but can cause failures. Test coverage reported by tools can make the manager look good, but this test code is useless as it can’t prevent bugs. What’s worse, the high coverage hides areas that do need attention.

This is my list of the top 5 unit test issues. What’s yours?

Do Unit Tests Find Bugs?

I’ve been writing software for over 20 years and don’t believe unit tests find bugs.

Yet, I wouldn’t want to work in a code base without unit tests.

Why unit tests don’t find bugs?

To understand why unit tests don’t find bugs, we can look at how they are created. Here are the three main ways to handle unit tests:

  • developers write the tests along with writing the code
  • Test Driven Development (TDD)
  • unit tests are considered a waste of time, so they don’t exist

When the same software developer writes unit tests and code simultaneously, the tests tend to reflect closely what the code does. Both tests and code follow the same logic, stemming from the same understanding of the problem. As a result, the tests won’t find major implementation issues. If they find small typos or bugs, it’s usually only by chance.

Test-driven development calls for writing unit tests before implementing product changes. Because no product code exists, the unit tests are expected to fail initially or even not compile. The goal is to write product code to make the tests pass. In TDD, new unit tests are added mostly to drive the implementation of new scenarios. An unsupported scenario could be considered a bug, but it’s far-fetched. As a result, TDD rarely finds existing bugs.  

If unit tests don’t exist, they cannot find any bugs.

If unit tests don’t find bugs, why do we write them?

While unit tests are not great at finding bugs, they are extremely effective at preventing new ones. Unit tests pin the program’s behavior. Any change that visibly modifies this behavior should make the tests fail. The developer whose changes caused the failures should examine them and either fix the tests—if the change in the behavior was intentional—or fix the code. Many test failures indicate assumptions that the developer unknowingly broke. Without tests, they would turn into customer-impacting bugs.

Other important advantages of unit tests include:

  • Documentation – comprehensive unit tests can serve as product specification
  • More modular and maintainable code – writing unit tests for tightly coupled code is difficult. Unit tests drive writing more modular and loosely coupled code because it is much easier to test.
  • Automated testing – unit tests are much faster to run and more comprehensive than testing changes manually.

If unit tests don’t find bugs, what does?

There are many ways to find bugs in the code. Integration testing, fuzz testing, and stress testing are just some examples. However, the three below are my favorite because they require little to no additional effort from the developers:

  • Exploratory testing: Try using the product you’re working on. See what happens if you combine a few features or try less common scenarios.
  • Code reviews: One weakness of unit tests is that they are implemented with the same perspective as the code. Code reviews offer the ability to look at the change from a different angle, which often leads to discovering issues.
  • Paying attention: Whenever you code, debug, or troubleshoot an issue, have your eyes open. Many bugs are hiding in plain sight. Carefully reading error messages, logs, or stack traces can lead to identifying serious problems.

Unit testing XSD schemas

Once in a while a new task no-one is really eager to work on pops-up. From my experience in teams that are not focusing on or use extensively Xml related technologies most (if not all) tasks that have anything to do with XSD schemas belong to this group. This was the case in our team recently and I ended up to be a “volunteer” since the schedule was tight and I previously worked on the managed Xml team. So, I started refreshing my rusted XSD skills and soon I got something that more or less worked. It was a good starting point but then I asked myself – “how do I test this”. I needed something lightweight that would fit in our unit tests. I briefly searched the Internet but could not find anything that would be suitable.  As the old saying goes, necessity is mother of invention, so I came up with my own way of testing the schema. I like it because it contains just 3 small (less than 30 lines total) helper methods, one helper schema and most of the unit tests are just 2-3 lines. The tests actually also helped me come up with a better design I originally had. Note, I don’t know if this is the “right” approach or if it would scale for bigger schemas. I only know that for the schema I had to write it worked fine.

So, let’s say we need to write a schema for Xml files that have a structure like this:

<Settings>
    <ServiceProvider Type="typeName">
      <Setting Name="Setting1" Value="Value1" />
      <Setting Name="Setting2" Value="Value2" />
    </ServiceProvider>

   <Factory Type="typeName">
     <Setting Name="Setting1" Value="Value1" />
     <Setting Name="Setting2" Value="Value2" />
     <Setting Name="Setting3" Value="Value3" />
   </Factory>
 </Settings>

and that both ServiceProvider and Factory elements are optional.

First we need to create a starting schema. For new schemas I usually create a sample Xml file, open it in Visual Studio and use Xml → Create Schema. The schema created by the VS is not really usable but gives me something I can iterate on. The main problem with the generated schema is that all the types are defined inline. This makes it hard to test – ideally we would like to test each type separately. Generating inline types leads to another problem – each element has its own type even if the same element is used repeatedly (let alone cases where the same types are used for different elements or where inheritance is involved). The key to testing a schema is to have simple types. The simpler the type the easier it is to test. Once a type is tested it can be used as a building block to build more complicated types but it won’t require any more comprehensive testing as part of the more complicated type. For the Xml structure above we can identify three types:

  • Setting (for Setting element)
  • ServiceTypeInitializer (a common type for ServiceProvider and Factory elements)
  • Settings (for Settings element)

The problem with unit testing all these types in separation is that the schema itself should not allow any but Settings element as the document element. Fortunately for testing purposes we can create a helper schema that will allow document elements of types that are normally not allowed to be document elements. We will conditionally add this helper schema to the schema set used for validating the input Xml. Why the helper schema needs to be added conditionally? The tested schema should not allow any but the Settings element as the document element. So, when testing the Settings element we must not add the helper schema to the schema set to make sure that this is the only element allowed as the document element. Let’s see how this looks like in practice. Here is the schema created by refactoring the initial schema created by Visual Studio:


<?xml version="1.0" encoding="utf-8"?>
<xs:schema attributeFormDefault="unqualified" elementFormDefault="qualified"
  xmlns:xs="http://www.w3.org/2001/XMLSchema">

  <xs:element name="Settings" type="Settings_Type" />

  <xs:complexType name="Settings_Type">
    <xs:sequence>
      <xs:element name="ServiceProvider" type="ServiceTypeInitializer_Type" minOccurs="0" maxOccurs="1" />
      <xs:element name="Factory" type="ServiceTypeInitializer_Type" minOccurs="0" maxOccurs="1" />
    </xs:sequence>
  </xs:complexType>

  <xs:complexType name="ServiceTypeInitializer_Type">
    <xs:sequence>
      <xs:element maxOccurs="unbounded" name="Setting" type="Setting_Type" />
    </xs:sequence>
    <xs:attribute name="Type" type="xs:string" use="required" />
  </xs:complexType>

  <xs:complexType name="Setting_Type">
    <xs:attribute name="Name" type="xs:string" use="required" />
    <xs:attribute name="Value" type="xs:string" use="required" />
  </xs:complexType>
</xs:schema>

Now let’s create the helper schema that will allow testing each of the types separately:


<?xml version="1.0" encoding="utf-8"?>
<xs:schema attributeFormDefault="unqualified" elementFormDefault="qualified" xmlns:xs="http://www.w3.org/2001/XMLSchema">
  <xs:element name="Setting" type="Setting_Type" />
  <xs:element name="ServiceTypeInitializer" type="ServiceTypeInitializer_Type" />
</xs:schema>

(In the above schema the Settings element is not present since it’s already allowed at the top level by the other schema). After creating the helper schema we need a function that will validate Xml documents against our schemas:


private static IEnumerable<ValidationEventArgs> RunValidation(string inputXml, bool includeHelperSchema)
{
    var schemaSet = new XmlSchemaSet();
    schemaSet.Add(schemaUnderTest);

    if (includeHelperSchema)
    {
        schemaSet.Add(helperSchema);
    }

    var readerSettings = new XmlReaderSettings()
    {
        Schemas = schemaSet,
        ValidationType = ValidationType.Schema,
        ValidationFlags = XmlSchemaValidationFlags.ReportValidationWarnings,
    };

    var events = new List<ValidationEventArgs>();
    readerSettings.ValidationEventHandler += (s, e) => { events.Add(e); };

    using (var reader = XmlReader.Create(new StringReader(inputXml), readerSettings))
    {
        while (reader.Read())
            ;
    }

    return events;
}

There are two interesting points here. First we need to turn on reporting validation warnings. This is because XmlSchemaSet has a nasty behavior where no error is reported if the document element of the validated Xml document is in different namespace that the targetNamespace of the schema. This may result in accepting documents that are not being validated at all. Turning on reporting warnings is the first step to catch this condition. The second interesting point is that schema validation will throw exceptions for validation errors but not for warnings. Again, to catch the condition where the expected and actual namespaces don’t match we have to set XmlReaderSettings.ValidationEventHandler which will be invoked for both validation errors and warnings. Other than that the method is pretty straightforward – we create an XmlSchemaSet instance and add the schema under test and conditionally the helper schema. Then we create an XmlReaderSettings object and set it up for schema validation. We use the reader settings to create a validating XmlReader. Finally we read the input xml with the validating reader – all errors and warnings are reported by invoking the validation event handler we set.
With the test driver method ready we can start writing test cases. We write test cases for each type starting from “leaf” types (i.e. types that are defined using only pre-defined schema types) moving to more complex types. If a type contains an element of a type that has already been tested we just test that schema accepts an Xml with the simplest child element of that type and, if the type is mandatory, the Xml is rejected if it does not contain the element. If there are multiple elements of the same type we just write test cases to test the type itself and not test cases to test all the possible elements of that type (they will be tested when testing their parent type). If there was a hierarchy we would write test cases for the base type and then test cases just for what was added (or removed – in case of derivation by restriction) in the derived type. The test cases themselves are simple – in most cases a hardcoded minimal Xml document is validated using the validation method we created and we check whether expected errors are reported or that there are no errors for valid Xml documents. Some examples:


[Fact]
public void Schema_accepts_minimal_valid_Xml()
{
    Assert.True(!RunValidation("<Settings />", false).Any());
}

[Fact]
public void Schema_rejects_Setting_Type_without_Name()
{
    var error = 
        RunValidation(@"<Setting Value=""ABC"" />", true)
        .Single();

    Assert.Equal(XmlSeverityType.Error, error.Severity);
    Assert.Equal(
        "The required attribute 'Name' is missing.",
        error.Message);
}

An exemplary test suite using XUnit can be found on my github. The Readme contains details about requirements, setting up the environment, building and running tests. If you just want to see what’s most interesting (i.e. the code) you can find it here

Pawel Kadluczka