Entity Framework View Generation Templates Updated for Visual Studio 2015

Entity Framework 7 may be around the corner and when it ships view generation will no longer be a concern because EF7 is not using views to abstract the database anymore. As of now, however, EF7 is still in beta and – as per the schedule – it will take another few months for it to be released. Even when it ships I don’t think many existing applications will ever move to EF7. In fact, there is still a lot of applications using EF5 or even EF4 that were never moved to EF6 and moving a pre-EF7 based app to EF7 may be even more difficult. In the meantime, Visual Studio 2015 was released. And while people not necessarily want to move their apps to use newer versions of dependencies many of them want to move to the latest available tooling. To make it possible I updated all the view generation templates so that they work with VS 2015. So, if you use or plan to use view generation templates in your applications download the latest version(s) from Visual Studio Gallery or install them directly from within Visual Studio. (Note that view generation templates in existing projects will continue to work in Visual Studio 2015 without this update. This update is required if you needed to add a new template to a project).

C++ Async Development (not only for) for C# Developers Part V: Cancellation

In the previous part of the C++ Async Development (not only for) for C# Developers we looked at exception handling in the C++ Rest SDK/Casablanca. Today we will take look at cancellation. However, because in C++ Rest SDK cancellation and exceptions have a lot in common I recommend reading the post about exception handling (if you have not already read it) before looking at cancellation.

C++ Rest SDK allows cancelling running or scheduled tasks. Running tasks cannot, however, be forcefully cancelled from outside. Rather, an external code may request cancellation and the task may (but is not required to) cancel an ongoing operation. (This is actually very similar to how cancellation of tasks works in C# async.)

So, cancellation in its simplest form is about performing a check inside the task to determine if cancellation was requested and – if it was – giving up the current activity and returning from the task. While conceptually simple, implementing a reusable mechanism that allows to “perform a check to determine if cancellation was requested” is not an easy task due to threading and intricacies around capturing variables in lambda expressions. Fortunately, we don’t have to implement such a mechanism ourselves since C++ Rest SDK already offers one. It is based on two classes – pplx::cancellation_token and pplx::cancellation_token_source. The idea is that you create a pplx::cancellation_token_source instance and capture it in the lambda expression representing a task. Then inside the task you use this pplx::cancellation_token_source instance to obtain a pplx::cancellation_token whose is_cancelled method tells you if cancellation was requested. To request a cancellation you just invoke the cancel method on the same pplx::cancellation_token_source instance you passed to your task. Typically you will call the cancel method from a different thread. Let’s take a look at this example:

void simple_cancellation()
{
    pplx::cancellation_token_source cts;

    auto t = pplx::task<void>([cts]()
    {
        while (!cts.get_token().is_canceled())
        {
            std::cout << "task is running" << std::endl;
            pplx::wait(90);
        }

        std::cout << "task cancelled" << std::endl;
    });

    pplx::wait(500);

    std::cout << "requesting task cancellation" << std::endl;
    cts.cancel();
    t.get();
}

Here is the output:

task is running
task is running
task is running
task is running
task is running
task is running
requesting task cancellation
task cancelled
Press any key to continue . . .

One noteworthy thing in the code above is that the pplx::cancellation_token_source variable is captured by value. This is possible because pplx::cancellation_token_source behaves like a smart pointer. It also guarantees thread safety. All of this makes it really easy to pass it around or capture it in lambda functions in this multi-threaded environment.

We now know how to cancel a single task. However, in real world it is very common to have continuations scheduled to run after a task completes. In most scenarios when cancelling a task you also want to cancel its continuations. You could capture the pplx::cancellation_token_source instance and do a check in each of the continuations but fortunately there is a better way. The ppxl::task::then() function has an overload that takes pplx::cancellation_token as a parameter. When using this overload the task will not run if the token passed to this function is cancelled. The following sample shows how this works:

void cancelling_continuations()
{
    pplx::cancellation_token_source cts;

    auto t = pplx::task<void>([cts]()
    {
        std::cout << "cancelling continuations" << std::endl;

        cts.cancel();
    })
    .then([]()
    {
        std::cout << "this will not run" << std::endl;
    }, cts.get_token());

    try
    {
        if (t.wait() == pplx::task_status::canceled)
        {
            std::cout << "task has been cancelled" << std::endl;
        }
        else
        {
            t.get(); // if task was not cancelled - get the result
        }
    }
    catch (const std::exception& e)
    {
        std::cout << "excption :" << e.what() << std::endl;
    }
}

Here is the output:

cancelling continuations
task has been cancelled
Press any key to continue . . .

In the code above the first task cancels the token. This results in canceling its continuation because we pass the cancellation token when scheduling the continuation. This is pretty straightforward. The important thing, however, is to also look at what happens on the main thread. In the previous example we called pplx::task::get(). We did this merely to block the main thread from exiting since it would kill all the outstanding threads including the one our task is running on. Here we call pplx::task::wait(). It blocks the main thread until the task reaches the terminal state and returns the status telling whether the task ran to completion or was cancelled. Note that if the task threw an exception this exception would be re-thrown from pplx::task::wait(). If this happens we need to handle this exception or the application will crash. Finally, for the completeness, we also have code that gets the result of the task (t.get()). It will never be executed in our case since we always cancel the task but in reality more often than not the task won’t be cancelled in which case you would want to get the result of the task.

There is a couple of questions I would like to drill into here:
– Why do we even need to use pplx::task::wait() – couldn’t we just use pplx::task::get()? The difference between pplx::task::wait() and pplx::task::get() is that pplx::task::get() will throw a pplx::task_canceled exception if a task has been cancelled whereas pplx::task::wait() does not throw for cancelled tasks. Therefore by using pplx::task::wait() you can avoid exceptions for cancelled tasks. This also may simplify your code when you handle exceptions in a different place than you would want to handle cancellation
– What happens if we don’t call pplx::task::wait()/pplx::task::get() and the task is cancelled? Sometimes we want to start an activity in the “fire-and-forget” manner and we don’t really care about the result so calling pplx::task::wait()/pplx::task::get() does not seem to be necessary. Unfortunately this won’t fly – if you call neither pplx::task::wait() nor pplx::task::get() on a task that has been cancelled a pplx::task_canceled exception will be eventually thrown which will crash your app – the same way as any other unobserved exception would do.

In the previous example we blocked the main thread to be able to handle the cancellation. This is not good – we use asynchronous programming to avoid blocking so it would be nice if we figured something out to not block the main thread. An alternative to handling a cancellation in the main thread is to handle cancellations in continuations. We can use the same pattern we used before to handle exceptions i.e. we can create a task based continuation in which we will call pplx::task:wait() to get the task status or pplx::task::get() and get a potential pplx::task_canceled exception. The important thing is that the continuation must not be scheduled using the overload of the pplx::then() function that takes the cancellation token. Otherwise the continuation wouldn’t run if the task was cancelled and the cancellation wouldn’t be handled resulting in an unobserved pplx::task_canceled exception that would crash your app. Here is an example of handling cancellation in a task based continuation:

void handling_cancellation_in_continuation()
{
    pplx::cancellation_token_source cts;

    auto t = pplx::task<void>([cts]()
    {
        std::cout << "cancelling continuations" << std::endl;

        cts.cancel();
    })
    .then([]()
    {
        std::cout << "this will not run" << std::endl;
    }, cts.get_token())
    .then([](pplx::task<void>previous_task)
    {
        try
        {
            if (previous_task.wait() == pplx::task_status::canceled)
            {
                std::cout << "task has been cancelled" << std::endl;
            }
            else
            {
                previous_task.get();
            }
        }
        catch (const std::exception& e)
        {
            std::cout << "exception " << e.what() << std::endl;
        }
    });

    t.get();
}

and the output:

cancelling continuations
task has been cancelled
Press any key to continue . . .

This is mostly it. There is one more topic related to cancellation – linked cancellation token sources but it is beyond the scope of this post. I believe that information included in this post should make it easy to understand how linked cancellation token sources work and how to use them if needed.

Arduino Pomodoro Timer

Some days are worse than other. On these bad days you don’t feel like working, people are constantly interrupting and, in general, not much is being done. When I have a day like this I use the Pomodoro technique to get back on track. The basic idea of the Pomdoro technique is that you try to focus solely on your work for 25 minutes minimizing all external and internal interruptions. You measure the time using a tomato shaped kitchen timer and hence the name – Pomodoro. Using the actual Pomodoro timer might seem like a good idea at first but in reality is not. The timer is ticking quite loudly which is annoying not only for you but also for people around. Using a software timer (I tried http://timemanage.me/) did not work for me either – other people can’t see it so it is impossible for them to know you are in the middle of your Pomodoro. On top of that you can’t check how much time is left without switching windows and losing focus which contradicts the very goal of Pomodoro (i.e. avoiding interruptions). This is why I decided to build my own Pomodorro timer. The requirements were simple – the timer had to be standalone so that I could check how much time is left with just one glimpse. To help prevent from external interruptions it also needed an indicator showing other people that I am busy. Meeting the first requirement was quite simple – a TM1637 based 4-digit LED display seemed good enough for the job. The second one was a bit harder. I got a little creative and bought a mood enhancing light (you should have seen my wife’s face when I showed her what I ordered) on Amazon. Now, that I got two most important parts the rest of the project was quite easy. I needed a few more parts like Arduino board (I went with Arduino Nano because of its size), a button (needed for restarting the timer), a color LED (to light my cube to indicate when I am busy) a small breadboard and a handful of resistors and jumper cables. This is the end result:

This project is quite easy but is really fun. You can try building a timer like this yourself. First connect the parts as shown on this picture:
PmodoroTimer_bb
Once the hardware part is done you need to upload the code to control the circuit. You can find the sketch in my ArduinoPomodoroTimer github repo. The most complicated part of the code is setting up the interrupt handler. I took it from my other project where I built a digital clock using an LCD display from an old Nokia phone. Take a look at this post for more details. Another complex piece is handling the LED display. Again, I wrote a very detailed post on this very subject a while ago so take a look at it to understand the code. The rest of the code is just about changing the color of the LED when the timer reaches 0 and reacting to button presses and is pretty straightforward.

Happy Pomodoring (is it even a word?)!

SignalR C++ Client

For the past several months I have been working on the SignalR C++ Client. The first, alpha 1 version has just shipped on NuGet and because there isn’t any real documentation for it at the moment I decided to write a blog post showing how to get started with it.
The SignalR C++ Client NuGet package contains Win32 and x64 bits for native desktop applications and is meant to be used with Visual Studio 2013.
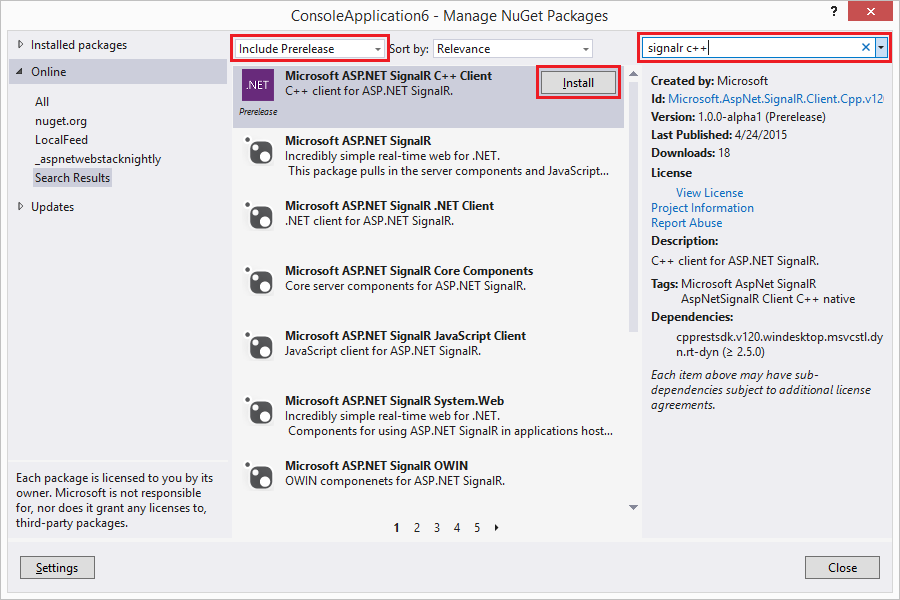
Since the SignalR C++ Client ships on NuGet adding it to a project is easy. After creating a C++ project (e.g. a console application) right click on the project node in the solution explorer and select the “Manage NuGet Packages” option. In the Manage NuGet Package window make sure to include prelease packages in your search by selecting “Include Prerelease” in the dropdown and enter “SignalR C++” in the search window. Finally click the “Install” button next to the Microsoft ASP.Net SignalR C++ Client package which will install the SignalR C++ Client (and its dependency – C++ Rest SDK) into your project.
Installing SignalR C++ from NuGet
You can also install the package from the Package Manager Console – just open the package manager console (Tools → NuGet Package Manager → Package Manager Console) and type:

Install-Package Microsoft.AspNet.SignalR.Client.Cpp.v120.WinDesktop –Pre

The SignalR C++ Client relies heavily on asynchronous facilities provided by the C++ Rest SDK (codename Casablanca) which in turn extensively uses lambda functions introduced in C++ 11. Understanding both – asynchronous programming and lambda functions is crucial to being able to use the SignalR C++ Client effectively. I started a blog mini-series on asynchronous programming in C++ which I would recommend to read if you are not familiar with these concepts.
The SignalR C++ Client supports both programming models available in SignalR – Persistent Connections and Hubs. Persistent Connections is just a simple way of exchanging data between the server and the client while Hubs enable RPC-like programming where it is possible to invoke a method on the server from the client and vice versa. In this post I will show how to use the SignalR C++ Client to handle both – Persistent Connections and Hubs.
Before we can move to the client code we need to set up a server. Our server will have two endpoints – one for persistent connections and one for hubs. To make it easy we will use the chat server from the SignalR tutorial as a starting point and we will add a persistent connection endpoint to it. Just follow the steps in the tutorial to create the server. (Alternatively you can get the code from ths SignalR C++ Client GitHub repo – just clone the repo and open the samples_VS2013.sln file with Visual Studio 2013). Note that if you follow the steps you will end up installing the latest stable available NuGet packages into your project instead of the version used in the tutorial and therefore you need to update the index.html file to use the version of the jquery.signalR-x.x.x.min.js that was installed into your project instead of the one used in the tutorial – i.e. if you installed version 2.2.0 of SignalR you will need to change
<script src="Scripts/jquery.signalR-2.0.3.min.js"></script>
to
<script src="Scripts/jquery.signalR-2.2.0.min.js"></script>
You should also set up index.html as the start page by right-clicking on this file in the Solution Explorer and selecting “Set As Start Page”. After you complete all these steps you should be able to run the server (just press Ctrl+F5) and send and receive messages from the browser window that opens.
Now we need to add a Persistent Connection endpoint to our server. It’s quite easy – we just need to add the following class to the project:

using System.Threading.Tasks;
using Microsoft.AspNet.SignalR;

namespace SignalRServer
{
    public class EchoConnection : PersistentConnection
    {
        protected override Task OnConnected(IRequest request,
            string connectionId)
        {
            return Connection.Send(connectionId, "Welcome!");
        }

        protected override Task OnReceived(IRequest request,
            string connectionId, string data)
        {
            return Connection.Broadcast(data);
        }
    }
}

and configure the server to treat requests sent to the /echo path as SignalR persistent connection requests which should be handled by the EchoConnection class. Adding the following line to the Configuration method in the Startup class will do the trick:

app.MapSignalR<EchoConnection>("/echo");

Our server should be now ready to use so we can now start playing with the client.

Using Persistent Connections

Our EchoConnection sends the "Welcome!" string to the client when it connects and then broadcasts messages it receives from the client to all connected clients. On the client side, after the client connects successfully, we will wait for the user to enter a string which will be sent to the server. We also print any message the client receives from the server. To be notified about messages we need to register a callback which will be invoked for whenever a message is received. Finally, if the user types “:q” (this is the command you want to remember when you try to git commit on a new box but forgot to configure the text editor git should use) the client will close the connection and exit. The code that does all of it is shown below (again, you can get the code from the SignalR-Client-Cpp repo – it is in the PersistentConnectionSample.cpp file)

void send_message(signalr::connection &connection,
                  const utility::string_t& message)
{
    connection.send(message)
        // fire and forget but we need to observe exceptions
        .then([](pplx::task<void> send_task)
    {
        try
        {
            send_task.get();
        }
        catch (const std::exception &e)
        {
            ucout << U("Error while sending data: ") << e.what();
        }
    });
}

int main()
{
    signalr::connection connection{ U("http://localhost:34281/echo") };
    connection.set_message_received([](const utility::string_t& m)
    {
        ucout << U("Message received:") << m 
              << std::endl << U("Enter message: ");
    });

    connection.start()
        // fine to capture by reference - we are blocking 
        // so it is guaranteed to be valid
        .then([&connection]()
        {
            for (;;)
            {
                utility::string_t message;
                std::getline(ucin, message);

                if (message == U(":q"))
                {
                    break;
                }

                send_message(connection, message);
            }

            return connection.stop();
        })
        .then([](pplx::task<void> stop_task)
        {
            try
            {
                stop_task.get();
                ucout << U("connection stopped successfully") << std::endl;
            }
            catch (const std::exception &e)
            {
                ucout << U("exception when starting or closing connection: ") 
                      << e.what() << std::endl;
            }
        }).get();

    return 0;
}

You may want to try more than one instance of the client to see that all clients receive messages broadcast by the server.

The code is intuitively simple but there are some interesting nuances so let’s take a closer look at it. In the main function, as explained above, we create a connection and we use the set_message_received function to set a handler that will be called whenever we receive a message from the server. Then we start the connection using the connection.start() function. If the connection started successfully we run a loop that reads messages from the console. Note that we know that connection started successfully because if connection.start() threw an exception this continuation would not run at all because it is a value based continuation (you can find more on how exceptions in C++ async work in my blog post on this very subject). Whenever a user enters a message we send the message to the server using the connection.send() function. Sending messages happens in the fire-and-forget manner but we still need to handle exceptions to prevent from crashes caused by unobserved exceptions. When the user enters “:q” we break the loop and move on to the next continuation which stops the connection. This continuation is interesting because it actually can be invoked in one more case. Note that this is a task based continuation so it will be invoked always – even if a previous task threw. As a result this continuation is also an exception handler for the task that starts the connection. Moving back to stopping the connection – stopping a connection can potentially throw so again we need to handle the exception to prevent from crashes.
There are two more important things. One is that tasks are executed asynchronously so we have to block the main thread to prevent the program from exiting and terminating all the threads (see another blog post of mine for more details). In our case we can just use the task::get() function – it is sufficient, simple and works. The second important thing is related to how we capture the connection variable in one of the continuations. We capture it by reference. We can do that because we block the main thread and therefore we ensure that the reference we captured will be always valid. In general case however capturing local variables by reference will lead to undefined behavior and crashes if the function that started a task exited before the task completes (or is even started) since the variable will go out of scope and the captured reference will no longer be valid. Blocking a thread to wait for the task works but usually is not the best way to solve the problem. If you cannot ensure that the reference will be valid when a task runs you should consider capturing variables by value or, if it is not possible (like in the case of the connection and hub_connection instances) capture a std::shared_ptr (or std::weak_ptr). Regardless of how you capture your variables (maybe except for primitive values captured by value) you need to make sure you work with them in a thread safe way because you never know what thread a task is going to run on.

Using Hubs

The sample for hub connections shows how to connect and communicate with the SignalR sample chat server. The code looks like this (you can also find it on GitHub in the HubConnectionSample.cpp):

void send_message(signalr::hub_proxy proxy, const utility::string_t& name,
                  const utility::string_t& message)
{
    web::json::value args{};
    args[0] = web::json::value::string(name);
    args[1] = web::json::value(message);

    proxy.invoke<void>(U("send"), args)
        // fire and forget but we need to observe exceptions
        .then([](pplx::task<void> invoke_task)
    {
        try
        {
            invoke_task.get();
        }
        catch (const std::exception &e)
        {
            ucout << U("Error while sending data: ") << e.what();
        }
    });
}

void chat(const utility::string_t& name)
{
    signalr::hub_connection connection{U("http://localhost:34281")};
    auto proxy = connection.create_hub_proxy(U("ChatHub"));
    proxy.on(U("broadcastMessage"), [](const web::json::value& m)
    {
        ucout << std::endl << m.at(0).as_string() << U(" wrote:") 
              << m.at(1).as_string() << std::endl << U("Enter your message: ");
    });

    connection.start()
        .then([proxy, name]()
        {
            ucout << U("Enter your message:");
            for (;;)
            {
                utility::string_t message;
                std::getline(ucin, message);

                if (message == U(":q"))
                {
                    break;
                }

                send_message(proxy, name, message);
            }
        })
        // fine to capture by reference - we are blocking
        // so it is guaranteed to be valid
        .then([&connection]()
        {
            return connection.stop();
        })
        .then([](pplx::task<void> stop_task)
        {
            try
            {
                stop_task.get();
                ucout << U("connection stopped successfully") << std::endl;
            }
            catch (const std::exception &e)
            {
                ucout << U("exception when starting or stopping connection: ")
                      << e.what() << std::endl;
            }
        }).get();
}

Let’s quickly go through the code. First we create a hub_connection instance which we then use to create a ChatHub proxy. Then we use the on function to set up a handler which will be invoked each time the server invokes the broadcastMessage client method. Note that the callback takes a json::value as a parameter which is an array containing parameters for the client method. If you ever used the SignalR .NET client then you probably notice it is different from what you are used to. The SignalR .NET Client does not expose JSON directly but uses reflection to convert the JSON array to typed values which are then passed to the On method as parameters. Since there isn’t reach reflection in C++ it is the responsibility of the user to interpret the parameters the SignalR C++ Client passes to the lambda in the on function. Once the hub proxy is set up we can start the connection and wait for the user to enter a message which we will then send to the server by invoking the server side send hub method. Server side hub methods are invoked with the hub_proxy::invoke function. This function has two flavors. One for methods that don’t return values: hub_proxy::invoke<void>(...), and one used to invoke non-void hub methods: hub_proxy::invoke<json::value>(...). If a server side hub method returns a value it will be returned to the user as a json:value and, again, it is up to the user to make sense out of it. There are also convenience overloads of hub_proxy::invoke function you can use to invoke a parameterless hub method which don’t take the arguments parameter. They will save you a couple lines of code required to create an empty JSON array.
Long running server side methods can notify the client about their progress. If the client wants to receive these notifications it can provide a callback that should be invoked each time a progress message is received. The callback is passed as the last parameter of the hub_proxy::invoke functions and defaults to a lambda expression with an empty body. The sample chat server does not have any method sending progress messages but if you are interested you can check SignalR end to end tests that tests this scenario.
That’s mostly it. The remaining code is just closing the connection and handling exceptions is done the same way as for Persistent Connection.
One important thing worth noting is how we capture the hub_proxy instance in the lambda – we do it by value. hub_proxy type has semantics of std::shared_ptr where all copies point to a single implementation instance which won’t be deleted as long as there is at least one instance that has a reference to it. As a result if you capture a hub_proxy instance by value in a lambda it will be valid even if the original variable is not around anymore. (Not that this matters in this particular example since we are blocking the thread anyways so even if we captured the hub_proxy instance by reference everything would work since the original variable does not go out of scope until the connection is closed).

Doing the right things

There are a few things you need to be aware of when working with the SignalR C++ client.

Prepare the connection before starting

SignalR C++ Client uses callbacks to communicate with the user’s code. However you can only set these callbacks when the connection is in the disconnected state. Otherwise an exception will be thrown. Similarly, when using hubs you have to create hub proxies before you start the connection.

Process messages fast or asynchronously

The callbacks invoked when a message is received (connection::set_message_received, hub_proxy::on) are invoked synchronously from the thread that receives messages. This is to ensure that the callbacks are invoked in the same order as the order the messages were received. The drawback is that the new messages won’t be received until the callback completes processing the current message. Therefore you need to process messages as quickly as possible or, if you don’t care about order, process messages asynchronously.

Handle exceptions

Any kind of network communication is susceptible to errors. Intermittent connection losses and timeouts may and will happen and they will result in exceptions. These exceptions have to be handled otherwise your app will crash due to an unobserved exception. To make exception handling easier the SignalR C++ Client follows a pattern where functions returning pplx::task<T> will not throw exceptions in case of errors but will instead return a faulted task. This saves the user from having to have an exception handler in addition to handling exceptions in a task based continuation. (You can read more about handling exceptions when using tasks here.

Capture connection and hub_proxy instances correctly

Copy constructors and copy assignment operators of the connection and hub_connection classes are intentionally deleted. This was done to prevent from capturing connection and hub_connection instances by value in lambda expressions (I also don’t think there is a clear answer as to what the operation of copying a connection should do). The issue with capturing connection and hub_connection instances by value is that because these classes use a std::shared_ptr pointing to the actual implementation it is possible to create a cycle which would prevent from destroying the connection instance (i.e. the destructor wouldn’t run). The cycle would result not only in a memory leak but would also keep the connection running after the variable went out of scope if the connection was not explicitly stopped – the destructor is responsible for stopping connections that were not stopped explicitly. The cycle would be created if a connection/hub_connection instance was captured by value in callbacks that are passed back to and stored in the connection or hub_connection instances i.e. callbacks passed to connection::set_message_received, set_reconnecting, set_reconnected, set_disconnected functions on both connection and hub_connection.
While deleting copy constructors and copy assignment operators on connection and hub_connection classes makes it more difficult to create a cycle it does not make it impossible – you could still inadvertently create a cycle if you capture a std::shared_ptr<connection> or std::shared_ptr<hub_connection> by value. So, what to do? The safest way is to create a weak pointer (std::weak_ptr) to the connection and capture this pointer. Then in the callback you will need call std::weak_ptr::lock() function to obtain a shared pointer to the connection. You need to check the return value of the std::weak_ptr::lock() function – it will return the nullptr if the instance it points to was destroyed (in which case you probably will want just to exit the callback). You could also try capturing the connection instance by reference by you will have to ensure that the reference is always valid when the callback is executed which sometimes might be hard to do.
Note that capturing hub_proxy instances by value is fine. Hub_proxy is linked back to the connection using a weak pointer so capturing hub_proxy instances by value won’t create cycles. If you, however, try invoking a function on a hub_proxy instance that outlived its connection an exception will be thrown.

Stop connection explicitly

While the connection is being stopped when the instance goes out of scope it is recommended to explicitly stop connections. Stopping the connection explicitly has a few advantages:

  • Throwing an exception from the destructor in C++ results in undefined behavior. As a result the connection class destructor (or to be more accurate the connection_impl dtor) catches and swallows all the exceptions. When stopping connections explicitly all the exceptions are passed back to the user (in form of a faulted task) giving the user a chance to handle them the way they see it fit
  • Stop is an asynchronous operation but the destructor isn’t. Therefore when the connection is running when the destructor is called the destructor blocks and waits until the stop operation completes. Since the destructor runs in the current thread you might experience “unexpected” delays – “unexpected” because the delay will happen even though you didn’t invoke any function explicitly. Rather the destructor is just called automatically for you when the variable leaves the scope (or when you call delete on dynamically allocated instances). These delays could be especially annoying if the current thread the destructor is running in happens to be the UI thread
  • Relying on the destructor stopping the connection may result in the connection not being stopped at all. Internally the connection is using std::shared_ptr pointing to the actual implementation which will be destroyed only when no one is referencing it. In case of a bug where the connection implementation instance stores a callback that captures its connection instance a cycle is created and the reference count will never reach 0. In this situation the destructor will never be called which means that not only would memory be leaked but also that the connection would never be stopped

Logging

The SignalR C++ Client is able to log its activities. You can control what activities are being logged and how they are logged. To control what’s being logged pass a trace_level to the connection or hub_connection constructor. The default setting is to log all activities. To control how the activities are logged you need to create a class derived from the log_writer class and pass a std::shared_ptr pointing to your writer in the when creating a connection/hub_connection instance. Your implementation has to ensure that logging is thread safe as the SignalR C++ Client does not synchronize logging in any way. If you don’t provide you own log_writer the SignalR C++ Client will use the default implementation that uses the OutputDebugString function to log entries. This is especially useful when debugging the client with Visual Studio since entries logged this way will appear in the Visual Studio Output window.

Limitations

While the SignalR C++ Client is fully functional it contains a couple of limitations. Currently the client supports only the webSockets transport. It also does not support detecting stale connections using the heartbeat mechanism. (The way heartbeat works in other clients is that the server sends keep alive messages every few seconds and if the client misses a few of these keep alive messages it will consider the connection to be stale/dead and will try restarting the connection. The SignalR C++ Client currently ignores keep alive messages). Finally, the SignalR C++ Client does not support sending or receiving State information.

Future

This is only an alpha 1 release. I expect there will be some bugs that have not been caught so far and fixing them should be a priority. Another interesting exercise is to try to make the SignalR C++ Client work on other platforms – specifically on Linux and Mac OS. It should be possible because the SignalR C++ Client is built on top of C++ REST SDK which is cross platform. Finally – depending on the feedback – adding new transports (at least the longPolling transport) may be something worth looking at.

SignalR on the Wire – an informal description of the SignalR protocol

I have seen the question asking about a description of the SignalR protocol come up quite a lot. Heck, when I started looking at SignalR I too was looking for something like this. Now, almost a year later, after I architecturally redesigned the SignalR C# client and wrote from scratch the SignalR C++ Client I think I can describe the protocol quite accurately. So, here we go.
In my view the protocol used by SignalR consists of two parts. The first part is related to connection management i.e. how the connection is started, stopped, reconnected etc. This part contains some quite complicated bits (especially around starting the connection) and it is mostly interesting to people who want to write their own client (which, I believe, is a minority). The second part which, I think, the vast majority of users is actually interested in is what are all these “H”s, “A”s, “I”s etc. SignalR is putting on the wire and writing to logs. I will start from the first part and then will describe the second part.
Disclaimer: In some cases I will be talking about differences among the clients. I have only worked with the SignalR .NET client, the SignalR C++ Client and the SignalR JavaScript Client (“worked” in this case is an overstatement – I just fixed a few bugs and looked at the code several times). I am aware of other SignalR clients like the Java or Objective-C one but I have not tried them nor looked at the code and I don’t know what they do, how they do it and how much they conform to the description below.

Connection Management
SignalR manages the connection by using the HTTP(S) protocol. Actions are initiated by the client which sends HTTP requests that contain the requested action and a sub-set of common parameters. The requests can be sent using the GET or (when using protocol version 1.5) POST method. Not all the requests require all the parameters. Here are the parameters used in SignalR requests with their descriptions:

  • transport – the name of the transport being used. Valid values: webSockets, longPolling, serverSentEvents, foreverFrame
  • clientProtocol – the version of protocol used by the client. The most recent version is 1.5 however it is only used by the JavaScript client since the change that mandated bumping the version of the protocol to 1.5 is only relevant for this client. The .NET and C++ clients currently use version 1.4. Note that the server is designed to support down-level clients (i.e. clients using previous versions of the protocol) and the current (2.2.0) version supports protocol versions from 1.2 to 1.5
  • connectionToken – a string that identifies the sender. It is returned in the response to the negotiate request. See this document for more details on connection token.
  • connectionData – a url-encoded JSon array containing a list of hubs the client is subscribing to. For instance if the client is subscribing to two hubs – “my_hub”, “your_hub” the array to be sent looks like this: [{"Name":"my_hub"},{"Name":"your_hub"}] and after url-encoding it becomes:
    %5B%7B%22Name%22:%22my_hub%22%7D,%7B%22Name%22:%22your_hub%22%7D%5D
  • messageId – the id of the last received message. Used for reconnecting and – when using the longPolling transport – in poll requests
  • groupsToken – a token describing what groups the connection belongs to. Used for reconnecting
  • queryString – an arbitrary query string provided by the user; appended to all requests

Starting the Connection
Starting the connection is the most complicated task related to connection management performed by a SignalR client. It requires sending three requests to the server – negotiate, connect and start. The whole sequence looks as follows:

  • the client sends the negotiate request. The response to the negotiate request contains a number of client configuration settings
  • the client starts the transport by sending the connect request. The connect request has to complete within the timeout returned by the server in the response to the negotiate request. The response to the connect request (a.k.a. init message) is sent on the newly started transport (i.e. if you use webSockets transport it will be sent on the newly opened websocket, if you use serverSentEvents it will be sent on the newly opened event stream if you use longPolling it will be sent as a response to the connect/poll request)
  • once the init message has been received the client sends the start request. The server confirms it received the start request by responding with the {Response: Started} payload

You can also find some details about the start sequence here.

Connection Management Requests
Here is a list of requests the client sends to start, stop and reconnect the connection.

» negotiate – negotiate connection parameters
Required parameters: clientProtocol, connectionData (when using hubs)
Optional parameters: queryString
Sample request:

http://host/signalr/negotiate?clientProtocol=1.5&connectionData=%5B%7B%22name%22%3A%22chat%22%7D%5D

Sample response:

{
  "Url":"/signalr",
  "ConnectionToken":"X97dw3uxW4NPPggQsYVcNcyQcuz4w2",
  "ConnectionId":"05265228-1e2c-46c5-82a1-6a5bcc3f0143",
  "KeepAliveTimeout":10.0,
  "DisconnectTimeout":5.0,
  "TryWebSockets":true,
  "ProtocolVersion":"1.5",
  "TransportConnectTimeout":30.0,
  "LongPollDelay":0.0
}

Url – path to the SignalR endpoint. Currently not used by the client.
ConnectionToken – connection token assigned by the server. See this article for more details. This value needs to be sent in each subsequent request as the value of the connectionToken parameter
ConnectionId – the id of the connection
KeepAliveTimeout – the amount of time in seconds the client should wait before attempting to reconnect if it has not received a keep alive message. If the server is configured to not send keep alive messages this value is null.
DisconnectTimeout – the amount of time within which the client should try to reconnect if the connection goes away.
TryWebSockets – whether the server supports websockets
ProtocolVersion – the version of the protocol used for communication
TransportConnectTimeout – the maximum amount of time the client should try to connect to the server using a given transport

» connect – starts a transport
Required parameters: transport, clientProtocol, connectionToken, connectionData (when using hubs)
Optional parameters: queryString
Sample request:

wss://host/signalr/connect?transport=webSockets&clientProtocol=1.5&connectionToken=LkNk&connectionData=%5B%7B%22name%22%3A%22chat%22%7D%5D

Sample response (a.k.a. init message):

{"C":"s-0,2CDDE7A|1,23ADE88|2,297B01B|3,3997404|4,33239B5","S":1,"M":[]}

Remarks:
The connect request starts a transport. If you are using the webSockets transport the client will use the ws:// or wss:// scheme to open a websocket. If you are using the serverSentEvents transport the client will open an event stream. For the longPolling transport the connect request is treated by the server as the first poll request. The response to the connect request is sent using the newly opened channel and is a JSon object containing the property "S" set to 1 (a.k.a. init messge). The server however does not guarantee this message to be the first message sent to the client (e.g. there can be a broadcast in progress which will be sent to the client before the server sends the init message. This is interesting in case of the longPolling transport because the response to the connect request will close the pending connect request even though it is not the init message. The init message will in that case be sent as a response to a subsequent poll request).

» start – informs the server that transport started successfully
Required parameters: transport, clientProtocol, connectionToken, connectionData (when using hubs)
Optional parameters: queryString
Sample request:

http://host/signalr/start?transport=webSockets&clientProtocol=1.5&connectionToken=LkNk&connectionData=%5B%7B%22name%22%3A%22chat%22%7D%5D

Sample response:

{"Response":"started"}

Remarks:
start request was added in the version 1.4 of the protocol to make some scenarios work reliably on the server side. Adding this request to the start sequence made things complicated on the client since though since there is quite a few things that can go wrong after the client received the init message but before it received a response to the start message (like the connection is lost and the client starts reconnecting, the user stops the connection etc.).

» reconnect – sent to the server when the connection is lost and the client is reconnecting
Required parameters: transport, clientProtocol, connectionToken, connectionData (when using hubs), messageId, groupsToken (if the connection belongs to a group)
Optional parameters: queryString
Sample request:

ws://host/signalr/reconnect?transport=webSockets&clientProtocol=1.4&connectionToken=Aa-
aQA&connectionData=%5B%7B%22Name%22:%22hubConnection%22%7D%5D&messageId=d-3104A0A8-H,0%7CL,0%7CM,2%7CK,0&groupsToken=AQ

Sample response: N/A
Remarks:
Similarly to the connect request the reconnect request starts (re-starts) the transport. For the longPolling transport from the client perspective it is just yet another form of poll, for the serverSentEvents transport a new event stream will opened, for the webSockets transport it will open a new websocket. The messageId tells the server what was the last message the client received and the groupsToken tells the server what groups the client belonged to before reconnecting.

» abort – stops the connection
Required parameters: transport, clientProtocol, connectionToken, connectionData (when using hubs)
Optional parameters: queryString
Sample request:

http://host/signalr/abort?transport=longPolling&clientProtocol=1.5&connectionToken=QcnlM&connectionData=%5B%7B%22name%22%3A%22chathub%22%7D%5D

Sample response: empty
Remarks: The JavaScript and C++ clients send abort request in a fire and forget manner and ignore all the errors. The .NET client blocks until response is received or a timeout occurs, what apart from taking more time, causes some issues (like this bug).

» ping – pings the server
Required parameters: none
Optional parameters: queryString
Sample request:

http://host/signalr/ping

Sample response:

{ "Response": "pong" }

Remarks: The ping request is not really a “connection management request”. The sole purpose of this request is to keep the ASP.NET session alive. It is only sent by the the JavaScript client.

SignalR Messages
Before we can take a look at the messages SignalR puts on the wire we need to discuss how different transports send and receive messages. The webSockets transport is quite simple since it is creating a full-duplex communication channel used to send data from the server to the client and from the client to the server. Once the channel is setup there are no further HTTP requests until the client is stopped (the abort request) or the connection was lost and the client tries to re-establish the connection (the reconnect request). The serverSentEvents transport creates an event stream that is used to receive messages from the server. If the client wants to send a message to the server it creates a send HTTP POST request and sends the data in the request body. The longPolling transport creates a long running HTTP request which the server will respond to if it has a message for the client. If the server does not send any data within a configured timeout (calculated as the sum of the ConnectionTimeout received in the response to the negotiate request + 10 seconds – which by default is 120 seconds) the current poll request will be closed and the client will start a new poll request (this is to prevent proxies from closing the long running request which would result in unnecessary reconnects). Sending messages works in the same way as for the serverSentEvents transport – a send HTTP request containing the message in the request body is sent to the server. Here are the descriptions of the send and poll requests.

» send – sends data to the server. Used by the serverSentEvents and longPolling transports
Required parameters: transport, clientProtocol, connectionToken, connectionData (when using hubs), data (sent in the request body)
Optional parameters: queryString
Sample request:

http://host/signalr/send?transport=longPolling&clientProtocol=1.5&connectionToken=Ac5y5&connectionData=%5B%7B%22name%22%3A%22chathub%22%7D%5D

Data send int the request body (url encoded, see the description below) :

data=%7B%22H%22%3A%22chathub%22%2C%22M%22%3A%22Send%22%2C%22A%22%3A%5B%22a%22%2C%22test+msg%22%5D%2C%22I%22%3A0%7D

Sample response (see the description below):

{ "I" : 0 }

» poll – starts a (potentially) long running polling request that the server will use to send data to the client. Used only by the longPolling transport
Required parameters: transport, clientProtocol, connectionToken, connectionData (when using hubs), messageId (the JavaScript client sends messageId in the request body)
Optional parameters: queryString
Sample request:

http://host/signalr/poll?transport=longPolling&clientProtocol=1.5&connectionToken=A12
-FX&connectionData=%5B%7B%22name%22%3A%22chathub%22%7D%5D&messageId=d-53B8FCED-B%2C1%7CC%2C0%7CD%2C1

Sample response (see the description below):

{
  "C":"d-53B8FCED-B,4|C,0|D,1",
  "M":
  [
    {"H":"ChatHub","M":"broadcastMessage","A":["client","test msg1"]},
    {"H":"ChatHub","M":"broadcastMessage","A":["client","test msg2"]},
    {"H":"ChatHub","M":"broadcastMessage","A":["client","qwerty"]}
  ]
}

Persistent Connection Messages

The protocol used for persistent connection is quite simple. Messages sent to the server are just raw strings. There isn’t any specific format they have to be in. The C# client has a convenience Send() method that takes an object that is supposed to be sent to the server but all this method does is just converting the object to JSon and invoke the Send() overload that takes string. Messages sent to the client are more structured. They are JSon strings with a number of properties. Depending on the purpose of the message different properties can be present in the payload or the message may have no properties (KeepAlive messages). The properties you can find in the message are as follows:

C – message id, present for all non-KeepAlive messages

M – an array containing actual data.

{"C":"d-9B7A6976-B,2|C,2","M":["Welcome!"]}

S – indicates that the transport was initialized (a.k.a. init message)

{"C":"s-0,2CDDE7A|1,23ADE88|2,297B01B|3,3997404|4,33239B5","S":1,"M":[]}

G – groups token – an encrypted string representing group membership

{"C":"d-6CD4082D-B,0|C,2|D,0","G":"92OXaCStiSZGy5K83cEEt8aR2ocER=","M":[]}

T – if the value is 1 the client should transition into the reconnecting state and try to reconnect to the server (i.e. send the reconnect request). The server is sending a message with this property set to 1 if it is being shut down or restarted. Applies to the longPolling transport only.

L – the delay between re-establishing poll connections. Applies to the longPolling transport only. Used only by the JavaScript client. Configurable on the server by setting the IConfigurationManager.LongPollDelay property.

{"C":"d-E9D15DD8-B,4|C,0|D,0","L":2000,
  "M":[{"H":"ChatHub","M":"broadcastMessage","A":["C++","msg"]}]}

KeepAlive messages
KeepAlive messages are empty object JSon strings (i.e. {}) and can be used by SignalR clients to detect network problems. SignalR server will send keep alive messages at the configured time interval. If the client has not received any message (including a keep alive message) from the server within a certain period of time it will try to restart the connection. Note that not all the clients currently support restarting connection based on network activity (most notably it is not supported by the SignalR C++ Client). Sending keep alive messages by the server can be turned off by setting the KeepAlive server configuration property to null.

Hubs Messages

Hubs API makes it possible to invoke server methods from the client and client methods from the server. The protocol used for persistent connection is not rich enough to allow expressing RPC (remote procedure call) semantics. It does not mean however that the protocol used for hub connections is completely different from the protocol used for persistent connections. Rather, the protocol used for hub connections is mostly an extension of the protocol for persistent connections.
When a client invokes a server method it no longer sends a free-flow string as it was for persistent connections. Instead it sends a JSon string containing all necessary information needed to invoke the method. Here is a sample message a client would send to invoke a server method:

{"H":"chathub","M":"Send","A":["JS Client","Test message"],"I":0,
  "S":{"customProperty" : "abc"}}

The payload has the following properties:
I – invocation identifier – allows to match up responses with requests
H – the name of the hub
M – the name of the method
A – arguments (an array, can be empty if the method does not have any parameters)
S – state – a dictionary containing additional custom data (optional, currently not supported by the C++ client)

The message sent from the server to the client can be one of the following:

  • a result of a server method call
  • an invocation of a client method
  • a progress message

Server Side Hub Method Invocation Result

When a server method is invoked the server returns a confirmation that the invocation has completed by sending the invocation id to the client and – if the method returned a value – the return value, or – if invoking the method failed – the error. There are two kinds of errors – general errors and a hub errors. In case of a general error the response contains only an error message and the error is turned by the client into a generic exception – the .NET client throws an InvalidOperationException, the C++ client throws a std::runtime_error and the JavaScript client creates an Error with the Exception as the source. Hub errors contain a boolean property set to true to indicate that they are hub errors and they may contain some additional error data. Hub errors are turned into a HubException by the .NET Client, a signalr::hub_exception by the C++ client and the JavaScript client creates an Error with source set to HubException. Here are sample results of a server method call:

{"I":"0"}

A server void method whose invocation identifier was "0" completed successfully.

"{"I":"0", "R":42}

A server method returning a number whose invocation identifier was "0" completed successfully and returned the value 42.

{"I":"0", "E":"Error occurred"}

A server method whose invocation identifier was "0" failed with the error "Error occurred"

{"I":"0","E":"Hub error occurred", "H":true, "D":{"ErrorNumber":42}}

A server method whose invocation identifier was "0" failed with the hub error "Hub error occurred" and sent some additional error data.

Here is the full list of properties that can be present in the result of server method invocation:

I – invocation Id (always present)
R – the value returned by the server method (present if the method is not void)
E – error message
Htrue if this is a hub error
D – an object containing additional error data (can only be present for hub errors)
T – stack trace (if detailed error reporting (i.e. the HubConfiguration.EnableDetailedErrors property) is turned on on the server). Note that none of the clients currently propagate the stack trace to the user but if tracing is turned on it will be logged with the message
S – state – a dictionary containing additional custom data (optional, currently not supported by the C++ client)

Client Side Hub Method Invocation

To invoke a client method the server extends the protocol used for persistent connections. The difference is that instead of sending a free flow text in the message portion of the message the server sends a JSon string that contains all the details needed to invoke the method (like the hub and method names and arguments). Here is an example of a message sent by the server to invoke a hub method on the client:

{"C":"d- F430FB19", "M":[{"H":"my_hub", "M":"broadcast", "A":["Hi!", 1]}] }

As you can see the “envelope” in form of message id or message property is the same as for persistent connections. The interesting part from the hub point of view is the value of the M property:

{"H":"my_hub", "M":"broadcast", "A":["Hi!", 1]}

This structure is quite similar to what the client is using to invoke a server hub method (except there is no invocation id since the server does not expect any response to this message).
H – the name of the hub
M – the name of the hub method
A – arguments (an array, can be empty if the method does not have any parameters)
S – state – a dictionary containing additional custom data (optional, currently not supported (ignored) by the C++ client)

Progress Message

The last kind of message sent from the server to the client is a progress message. When a server method is a long running method the server can send the information about the progress of execution of the method to the client. Similarly to the client method invocation the progress information is embedded in the message portion of a persistent connection message. The entire message looks like this:

{"C":"d-5E80A020-A,1|B,0|C,15|D,0", M:[{I:"P|1", "P":{"I":"0", "D":1}}] }

but the progress message itself looks like this:

{I:"P|1", "P":{"I":"0", "D":1}}

The structure containing information about progress contains two properties:
I – kind of an invocation id but prepended with "P|". Used only by older clients.
P – an object containing actual information about progress

The object containing “real” progress information has the following properties:
I – invocation id that tells which invocation this progress message applies to
D – progress data returned by the method

Note that there might be multiple progress messages sent to the client before the server sends the actual result of the invoked method.

Recent Protocol Revisions

  • 1.4 – introduction of the start request
  • 1.5 – requests can now be sent using the POST method. This helps avoid a memory leak when using the longPolling transport in Chrome and IE browsers (bug 2953). Only used by the JS client when with the longPolling transport. Note that the only properties the server checks the request body for are the groupsToken and the messageId

That’s pretty much it. The SignalR protocol is not very complex but the little caveats and exceptions may make the implementation a bit troublesome.